A professional video capture software is available on UAB classroom computers and can be used to recording lectures manually. Use this guide to start/stop an ad-hoc recording on the classroom computer.
Note: Kaltura Classroom is only available on classroom computers. Users who want to capture lectures on their personal device can download Kaltura Capture.
Note for users of screen readers: letters in parentheses in the instructions below refer to corresponding areas on example images. If you have any questions about these instructions, contact Learning Technologies support for assistance.
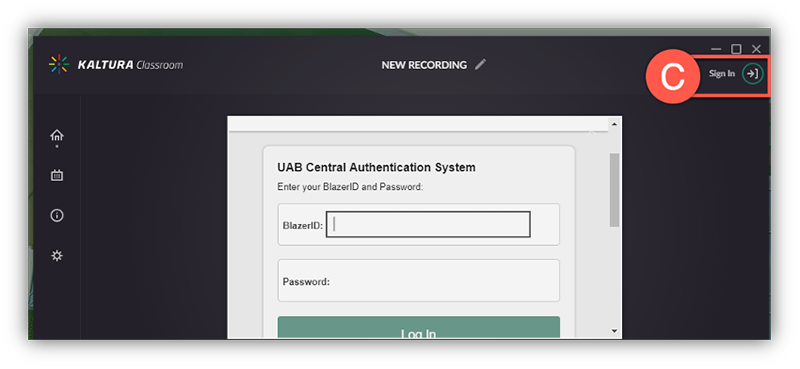
Step 1 – Open Kaltura Classroom & Sign in
- Type Kaltura (A) in the search bar at the bottom left of the desktop and click the Kaltura Classroom (B) app to open.

- It may take a minute to open and appear on the desktop. If Kaltura Classroom does not appear when searching, contact AskIT and your local IT support group to have it installed.
- Click the Sign-in (C) icon at the top right, type your BlazerID and Password, and complete Duo-Authentication.
Step 2 – Confirm or Set Desired Inputs
Before starting the recording, it is important to ensure that your desired video and audio inputs are selected.
- A preview (A) displays the currently selected inputs for Primary video, secondary video, and audio.
- To change the selected inputs:
- Select the Primary Input Settings (B) icon for your primary video.
- Select the desired input option (C).
Tip: Users usually want this to be their screen which is where their presentation or other items may be shown. - Click Back (D) to save the input selection.
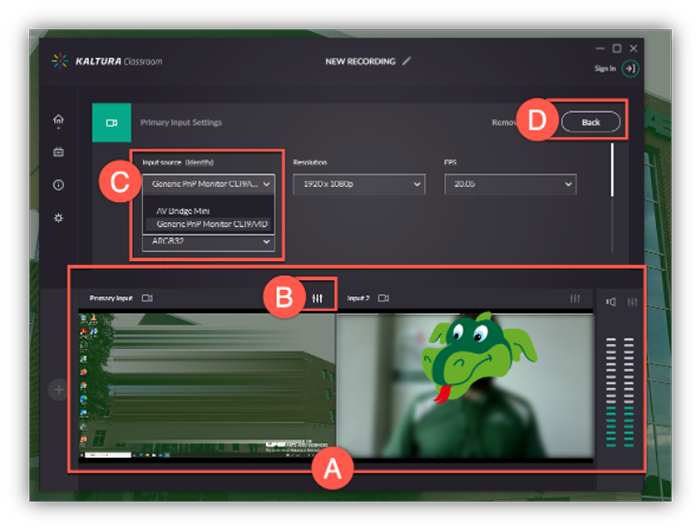
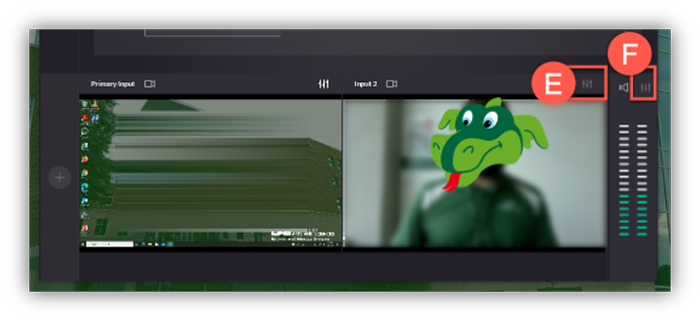
- Repeat this process to change the secondary video input (E) and Audio (F) input selections.
Step 3 - Start Kaltura Classroom Recording
- When you are ready for the ad-hoc recording to begin, click the Red Circle.
 Note: If you have not already signed-in, it will require you to provide your BlazerID/Password and complete DUO before the recording will begin.
 - A timer will count down from 5 to 1 and the recording will begin. The Kaltura classroom application will disappear and continue to run in the background.
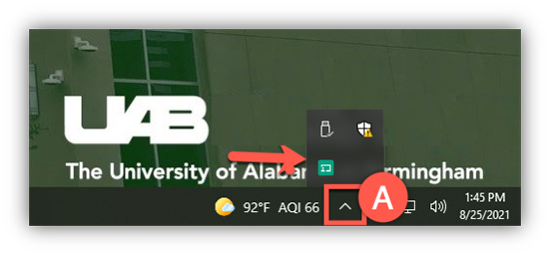
Step 4 - End and Save Recording
- When you are ready to end the recording, you will need to pull up the Kaltura application. You can find Kaltura in the Task tray arrow (A) at the bottom right of the computer or search for the app from the start menu at the bottom left as you did when you opened it.
- Click Stop (B) to end your recording. Note that users can pause/resume (C) or cancel/delete (D) recording.

- An edit screen will appear with the default name “Kaltura Classroom Recording [Today’s Date/time]. Change this name (E) if desired and click Save (F). The video will upload to your My Media folder in Kaltura where it can be edited and published to students.
