The use of Microsoft Teams to replace Canvas is hopefully temporary, but if we are in a situation where it is necessary, you should work to make the use of Teams as effective as possible for however long it is needed. Each course will have a Teams Class created in Microsoft Teams where you can provide content and conduct course activities. You will not, however, be able to recreate the complexity of a fully developed Canvas course.
Note for users of screen readers: Letters in parentheses in the instructions below refer to corresponding areas on example images. If you have any questions about these instructions, contact the Office of Learning Technologies for assistance opens a new website.
Fast Start
Focus first on getting your next week set up so that students have what they need to continue working. This could be as simple as dropping your syllabus and a Word document with instructions on what to do that week into the Teams Class. Or, you could add modules and assignments as described later in this guide. These Fast Start steps will describe how to get content in the Teams quickly.
- Go to the Class (see Accessing Teams Classes) and post in the General channel. This is where students will land when they click on the class.
- Create a welcome message that includes directions for the week ahead and attach your syllabus to the message. See the Figure 1 Welcome message below.
- When notifying students, tell them to look in the General channel.

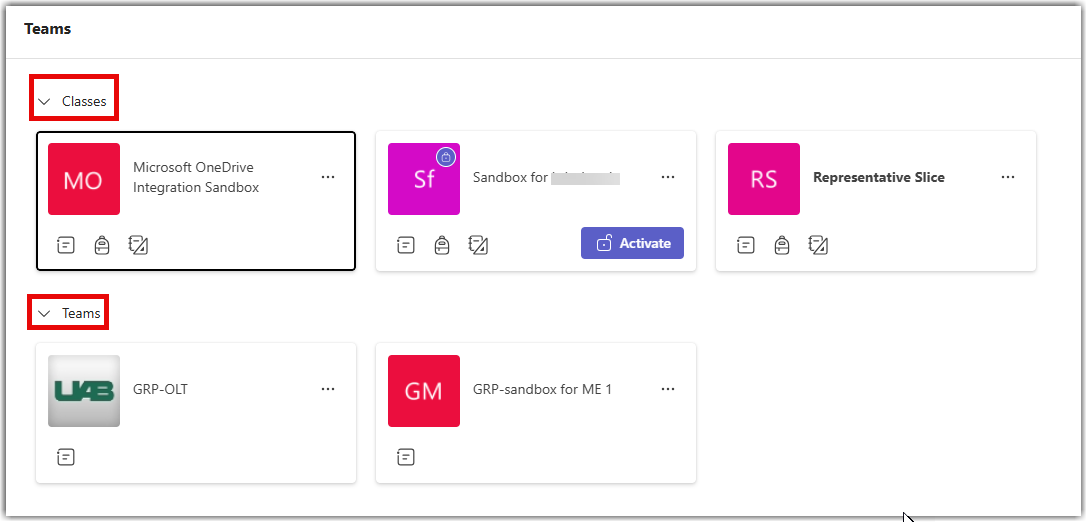
Accessing Teams Classes
A Teams Class for your course is being created automatically. When you log into Teams, go to the Teams icon on the left of the screen and look for the tile with your class name. If you do not see the course, be sure you have toggled open the Classes widget at the top.
Creating a Meeting
Even with a fully asynchronous course, providing some synchronous online meetings in the form of office hours or general meetings to discuss content is a good idea, especially in emergency situations. Keep in mind, however, that you cannot require that students in an asynchronous course meet at a specific time. You can only do your best to schedule them at times that benefit the most students. You can record such meetings for others to review when they can. Consider creating a poll in Teams opens a new website to identify the best time for these.
Creating a Teams Meeting
- Go to the Teams Class General channel, select the camera icon on the top right, and choose either meet now or schedule a meeting (A).
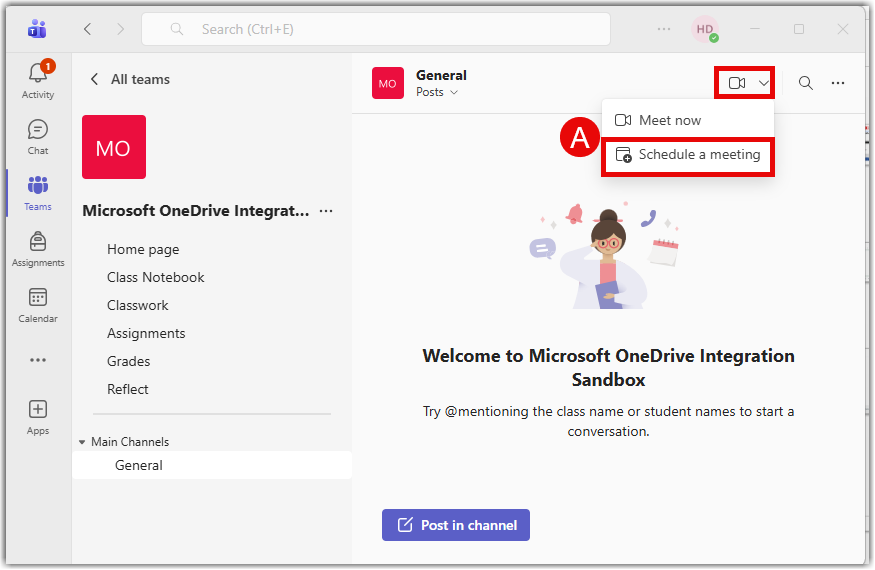
- Add the title and the description and set the meeting to record and transcribe (B) if so desired.

Adding a Meeting Recording to Teams Class
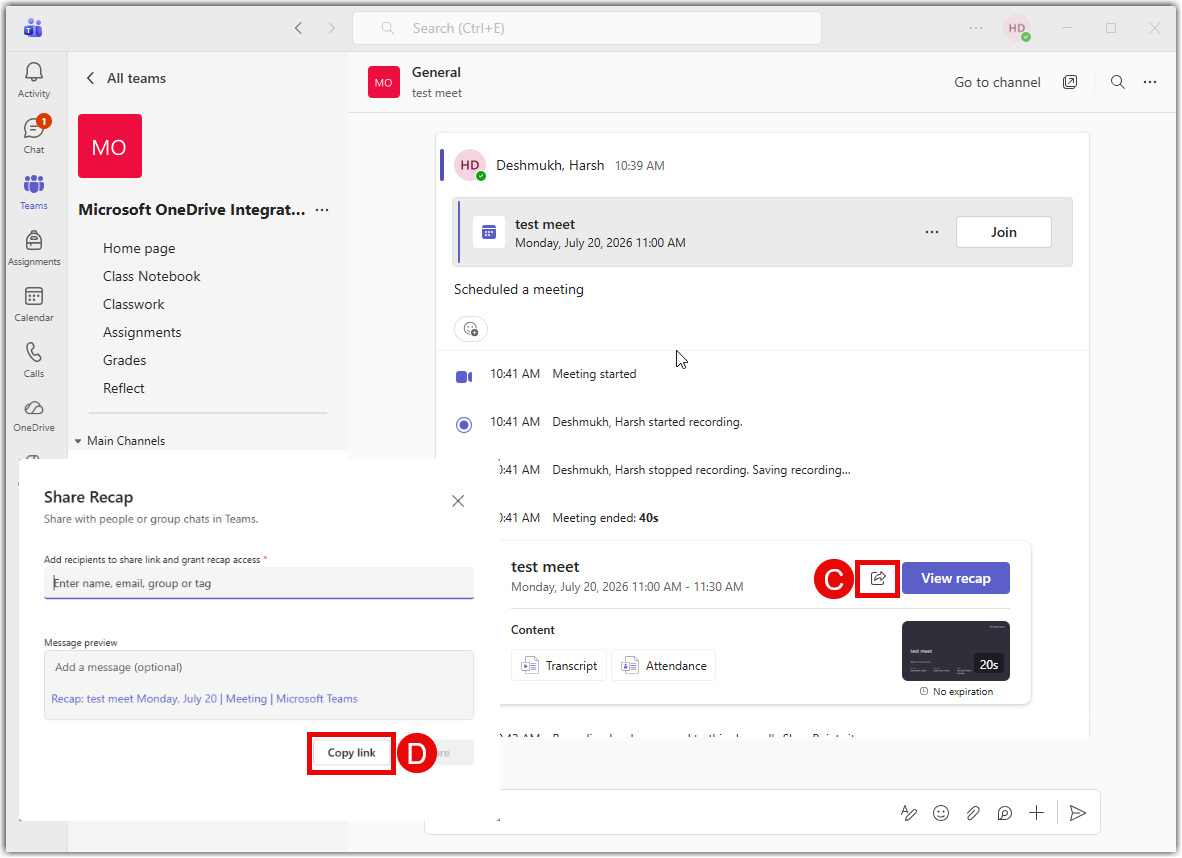
- After the meeting, the meeting will appear in the General channel of your Teams Class where students can view it. If you want to put it in a Classwork module or elsewhere, select share (C) and Copy link (D).
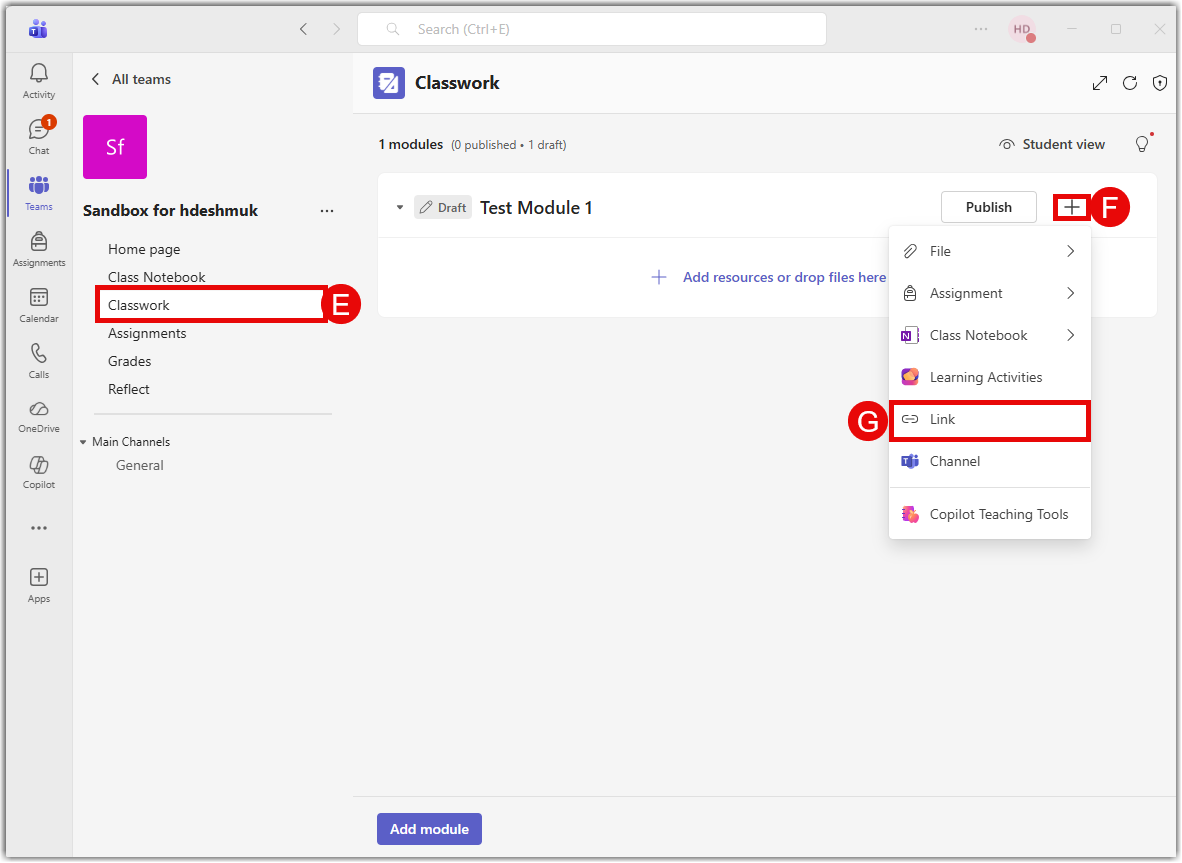
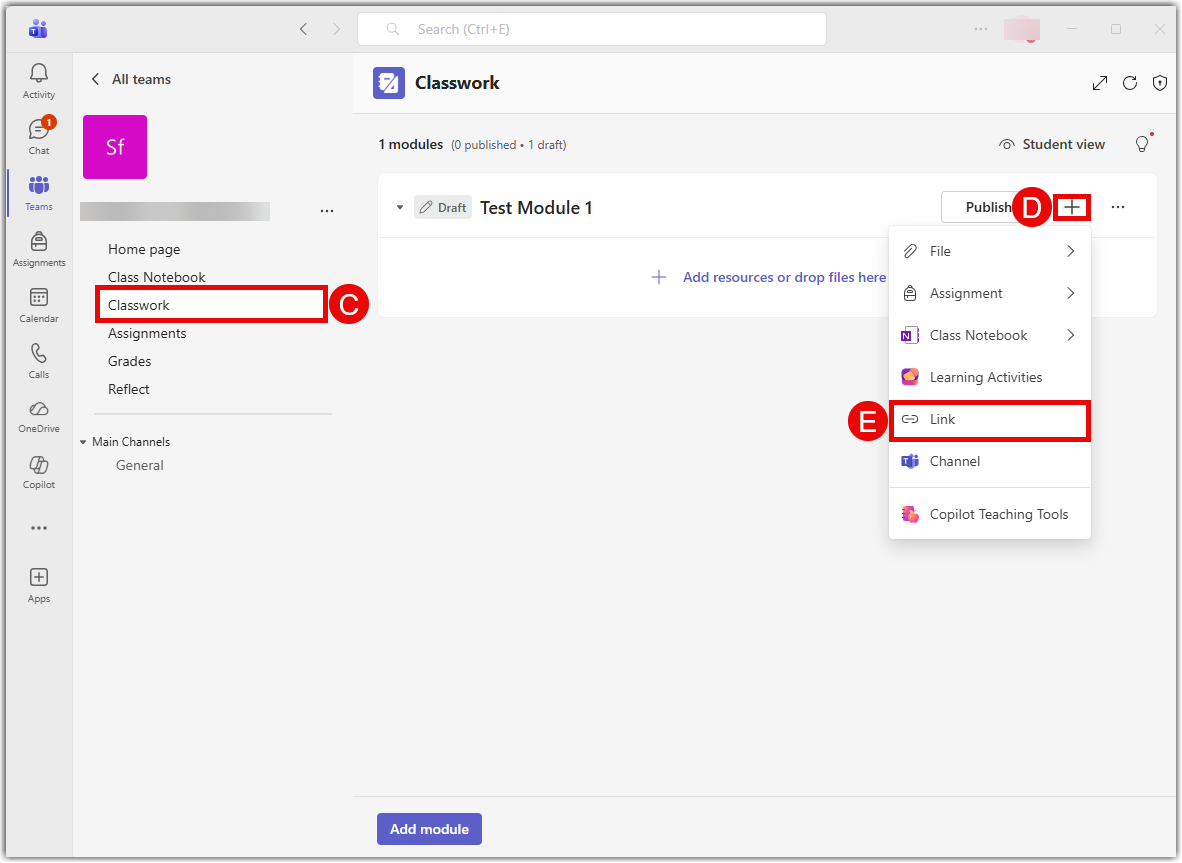
- To put it in Classwork, go to Classwork (E) and select the + icon (F) icon on the module where you want to add the recording. Select Link (G) to add the copied link.
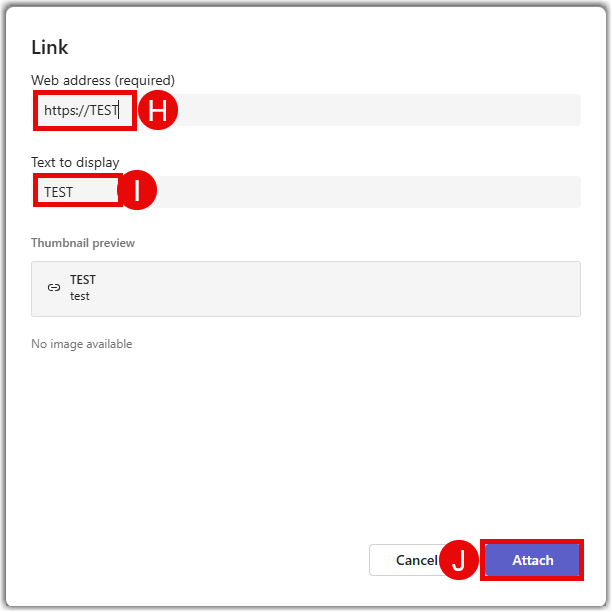
- Paste the link in the web address tab (H) and give the text to display (I) and attach (J) the link.
Building Your Course
There are a number of options for organizing the course. We recommend editing the Home page to create a welcome message. Here, you can add widgets to the page if you choose to such as a list of recent files. But you can also remove the default widgets and have simply a basic homepage that directs students to your modules.
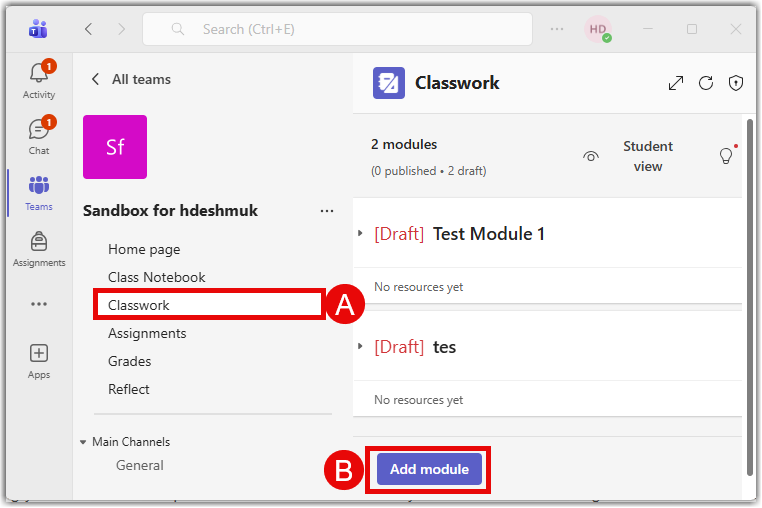
Modules are created in Classwork (A) shown in the image below. Click the Classwork link on the left of the screen, and then click Add module (B) at the bottom of the screen to add a new one. In the module, you can create your usual introduction to the module along with instructions.
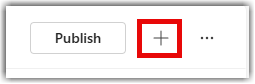
After saving your module, you can add assignments, files, and other content by clicking the large plus sign on the right of the module.
Adding Video
External videos cannot be embedded in Teams modules like you can in Canvas. However, you can add links to videos from your Kaltura MediaSpace, upload videos directly from any device, or record videos to add to the module as attachments. For accessibility purposes, it is strongly recommended that you only upload video to Kaltura and link to it from there.
Adding Kaltura Video
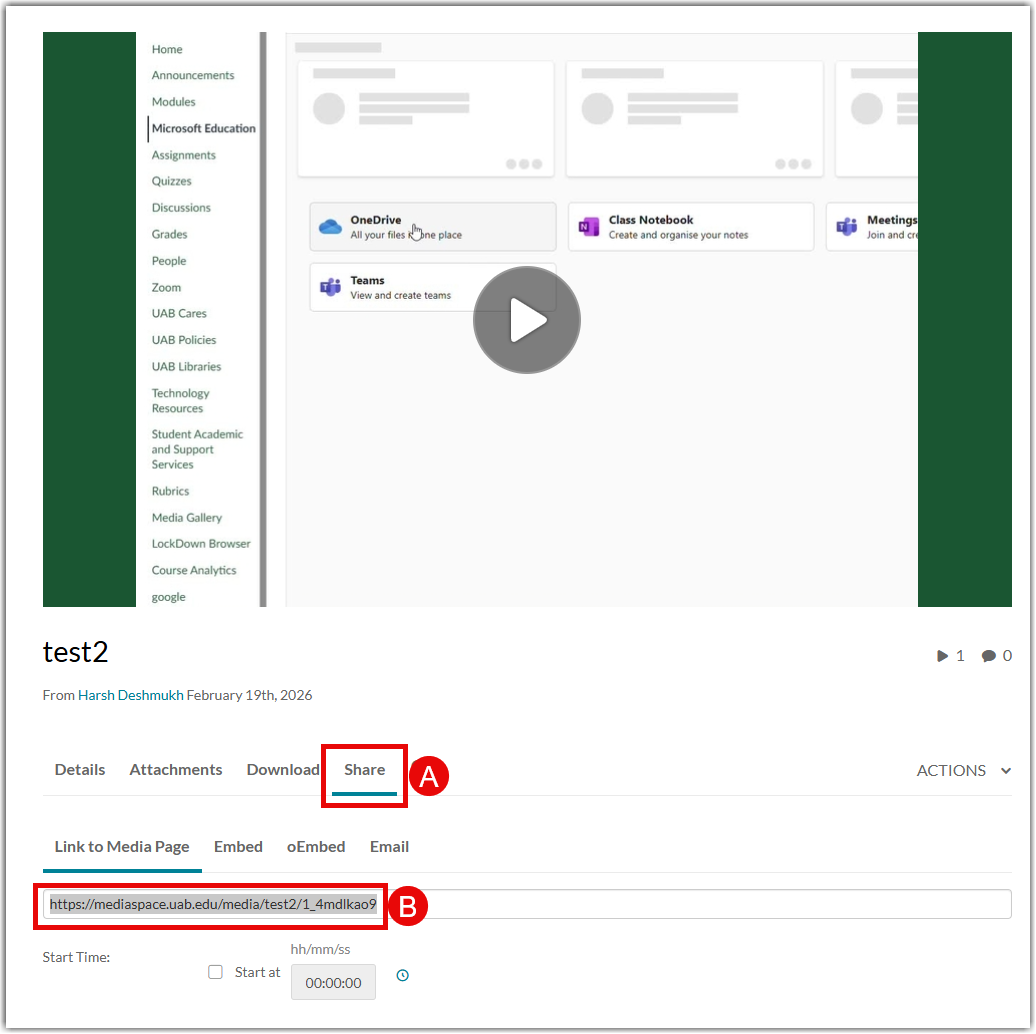
- To add a link from Kaltura media, open the media in Media Space opens a new website and click Share (A). Copy the Link to Media Page (B).
- Go to Classwork (C) on your Teams Class and select the plus symbol (D) in the desired module where you want to add the media. Select the Link (E) option in the list.
- Paste the link in the Web address field (F) and put the title in text to display field (G). Select Attach (H) to add the media.

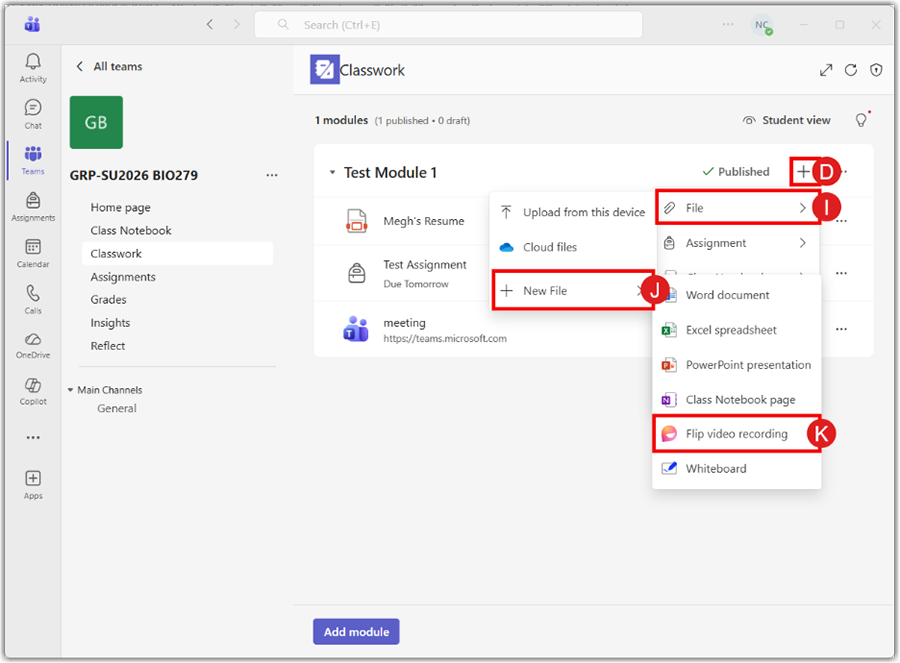
Recording Video in Teams
Teams allows you to record video inside Teams, called “Flip Video,” and attach to a module or page. For Flip video recording, go to the plus symbol (D) on the module. Select File (I) and click on New File (J). Select Flip Video recording (K) to record an instant video.
Student-submitted Videos
Students can also submit videos for assignments either via links, uploads, or recording directly into Teams via the same methods. Note that any video files uploaded to Teams are downloadable. Instructor videos added to teams can be downloaded by students and vice versa. But students cannot download other students’ videos that are submitted for assignments through the assignment tool.
Creating Assignments
Learn how to create assignments in Teams opens a new website.
If it is easier for you, you can create a one-question quiz that allows students to attach a file or type a text response. If this works as an assignment type for you, see Creating Quizzes.
Creating Quizzes
You can add timed or untimed quizzes to your module. Please note that this tool does not have an option to use question banks.
To add a quiz to a module in the Classwork tab, click on the module name to expand it. Select the plus sign at the top right, choose Assignment, and then choose New Quiz.
- Select + Add quiz at the top of the pop-up window.
- You will initially see a message to draft with Copilot. Close this message.
- Click on “Create a fun and engaging title for your quiz!” and change the title.
- Select “Quiz start with.”
- Select a question type and fill in the information (Question, answer choices, points, etc.) for that question. The most common types of questions are listed below.
- The Choice question type will allow you to create multiple choice and select all that apply type questions.
- Use the Text question type if you want students to type an answer.
- The Upload File question type can be used if you want students to submit a document. This would be used in place of an assignment.
- The Section question type is not an actual question. This can be used to organize the other questions into sections such as by chapter or topic.
- Settings – At the top right corner, select the gear symbol to access the settings. You can change settings regarding the time limit and feedback options in this panel. You cannot select the due date in this panel. You will do that in the next step.

- After updating the settings, select Done. This will bring you to a screen where you can edit the title of the quiz and add instructions.
- On the right, of this screen is where you will choose the due date and time.
- Under the date and time is a link for “Edit Assignment Timeline.” If you select that, you can choose the Schedule date (when the assignment opens), the Due date, and the Close date. If there is no Close date chosen, students will be able to submit past the due date.
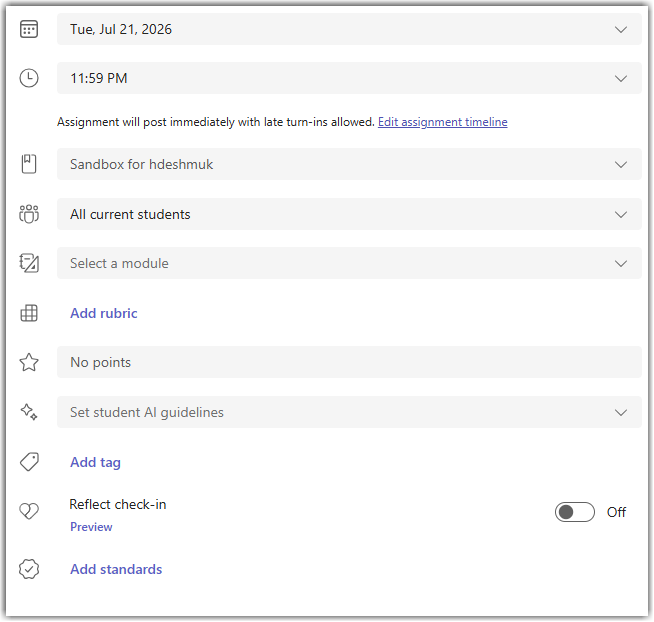
- When all settings are finalized, select Assign at the bottom right-hand corner of the screen. Note: If you chose to schedule the quiz to open at a later date, the button will say Schedule instead of Assign.
Uploading Quizzes from Word or PDF
You can convert a quiz from a Word or PDF document into one you can use in Teams through Microsoft forms. See Convert a Word or PDF form or quiz to Microsoft Forms . Once converted, you can then assign the quiz in your Teams Class. See Assign quizzes to students through Microsoft Teams opens a new website.
Quiz Accommodations
If you have one or more students who need a different amount of time to take the quiz, create a second quiz with the new time limit, and assign it to the specific student(s).
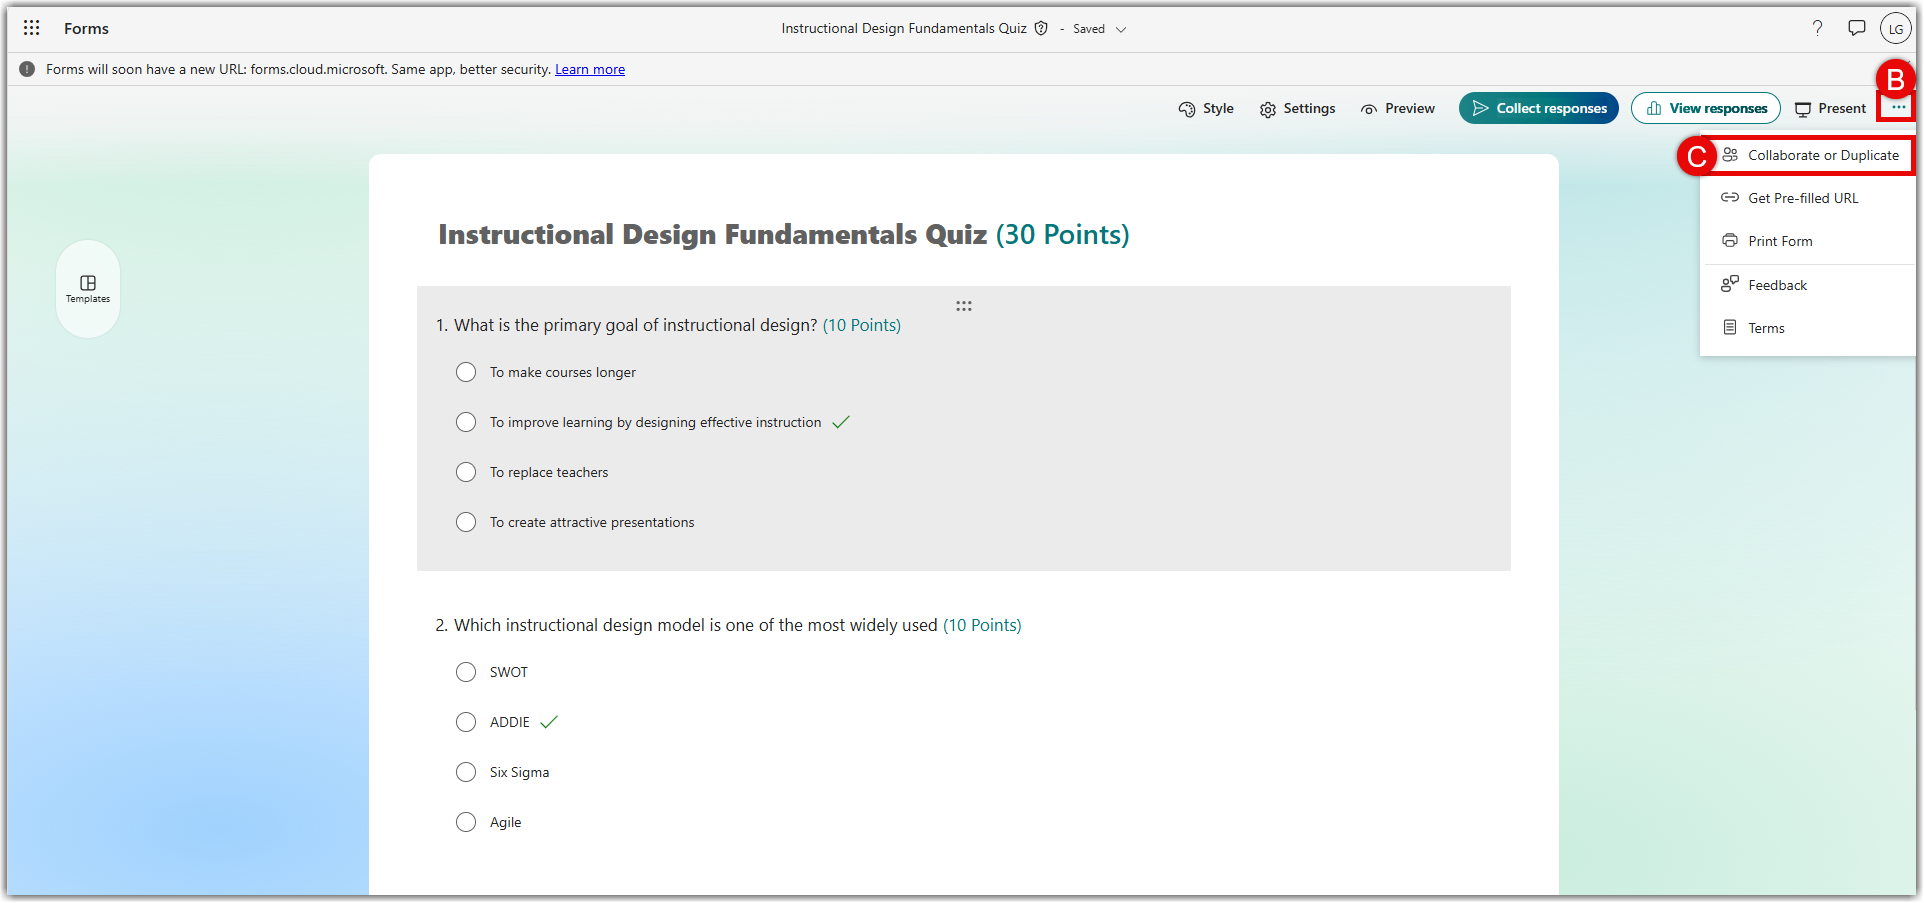
Duplicating a Quiz
- Quizzes created in Teams will appear in your Microsoft Forms page opens a new website. On that page, select your quiz.
- Select the 3 dots (B) on the top right of the form and select Collaborate or Duplicate (C).
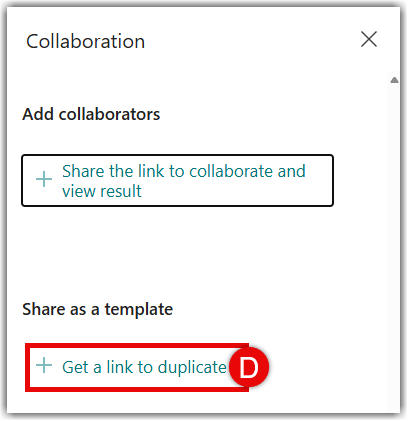
- Select Get link to duplicate (D).
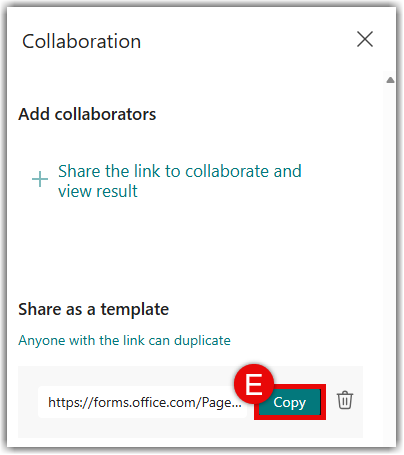
- Copy (E) the link and paste it into a new page.
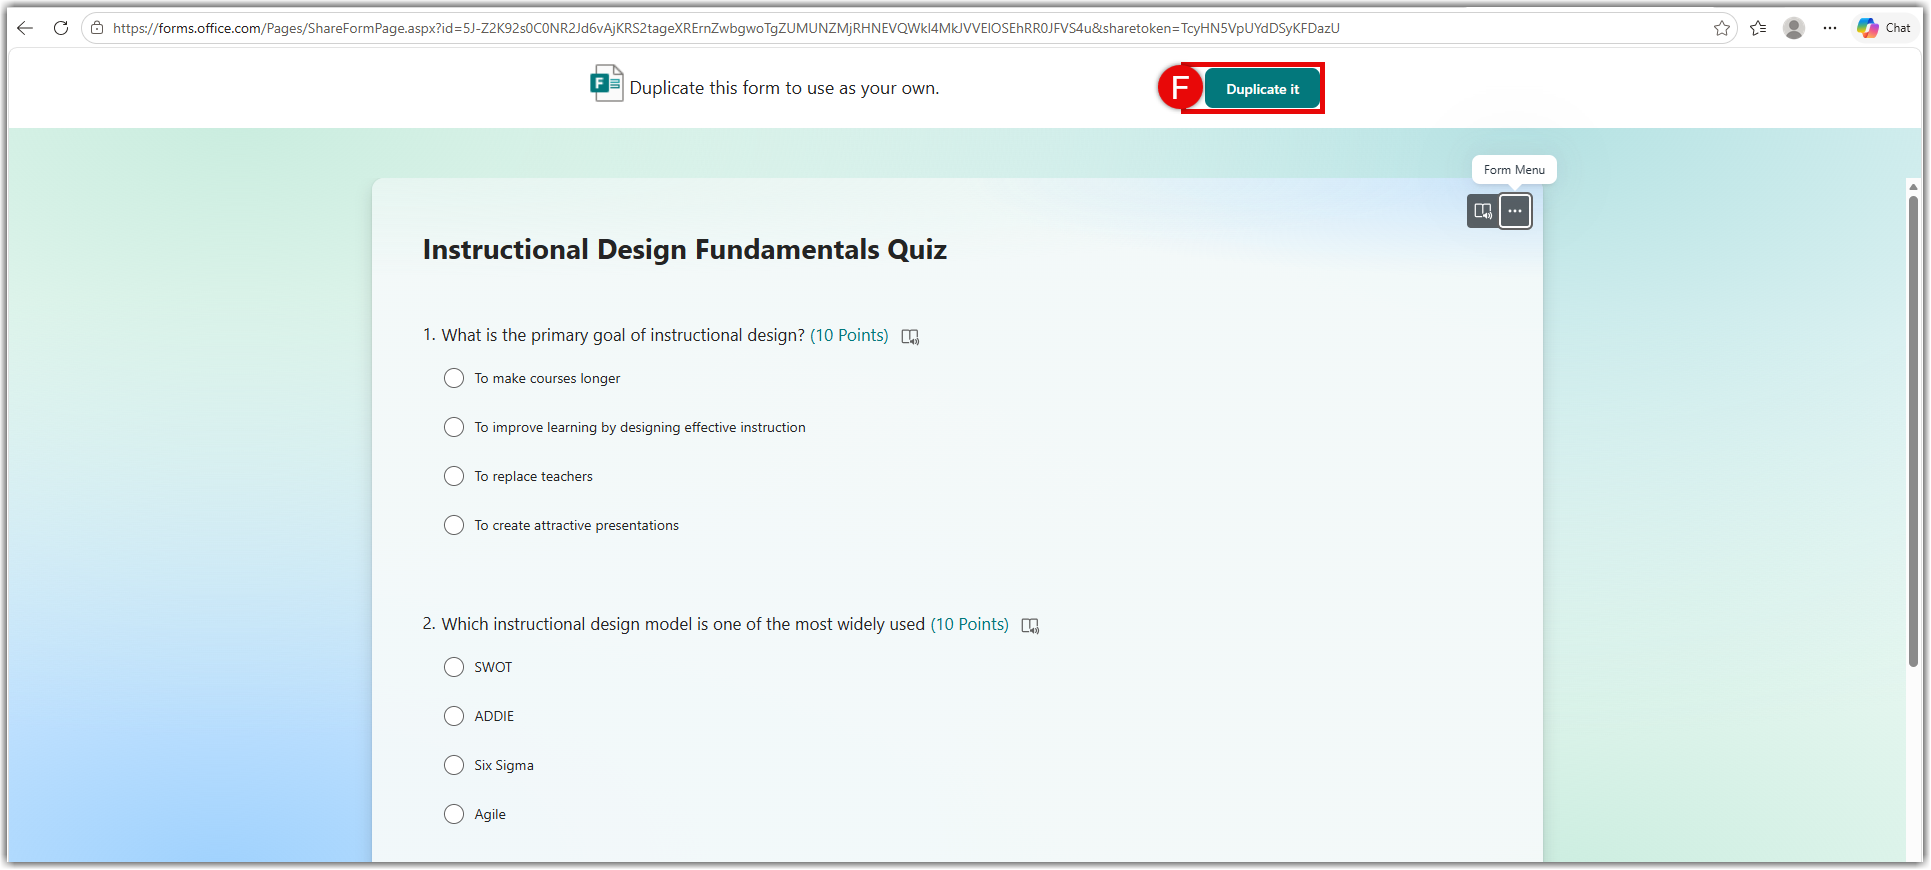
- Select Duplicate (F) on the top of the form.
Adding Other Tools
Although most tools you are used to using inside Canvas, such as Turnitin, are not available in your Teams Class, you can still access those tools directly and link to the tool for your students. Any grading done in one of these tools, like Turnitin, will need to be gathered with your other grading because they will not write back to your Teams Class grades. See this list of approved tools opens a new website with URLs for direct access if available.
Grading
You can see student grades on quizzes and assignments in the Grades tab. See Track student progress in the Grades opens a new website tab to learn more. Also consider exporting your grades opens a new website for use outside of Teams in Excel or other program. Remember also that any external tools you use, such as Turnitin, will not write grades back to Teams grades, so you will need to add them to your grades collection.
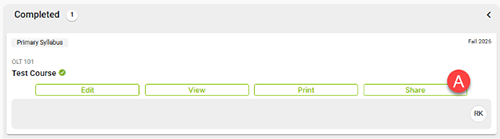
Simple Syllabus
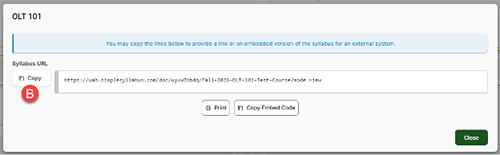
If you have completed your syllabus in Simple Syllabus, you can access the document through your Simple Syllabus dashboard opens a new website. Login to your Simple Syllabus dashboard with your BlazerID and password. On the right, you will see completed syllabi and options to print or share. Select Share (A) to see the link for the syllabus. Copy the link (B) and paste it into your Microsoft Teams. Students using the link will get a message to login. They should select “Click here to log in using your institution credentials” and login using their BlazerID.
Crosslisted Courses
If you have a crosslisted course, you will have a single Team just as you have a single Canvas course. If you want to separate content and activity, we recommend creating separate channels for each section of the course. While Classwork and other tools like assignments will be visible to all, you can share documents and communication posts to students in the individual channels to differentiate their class work.
How to Create and Add Members to a Channel
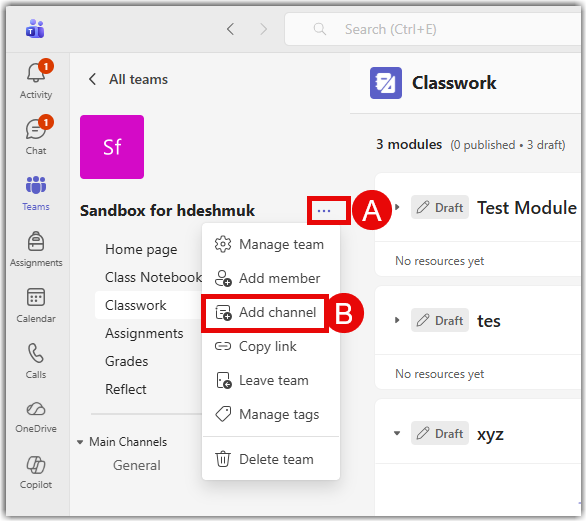
- To create a channel, enter your Teams Class and click on the three horizontal dots to the right of your title of the Team Class (A), then and click on Add channel option (B)
- Give a name to your channel in channel name field (C)
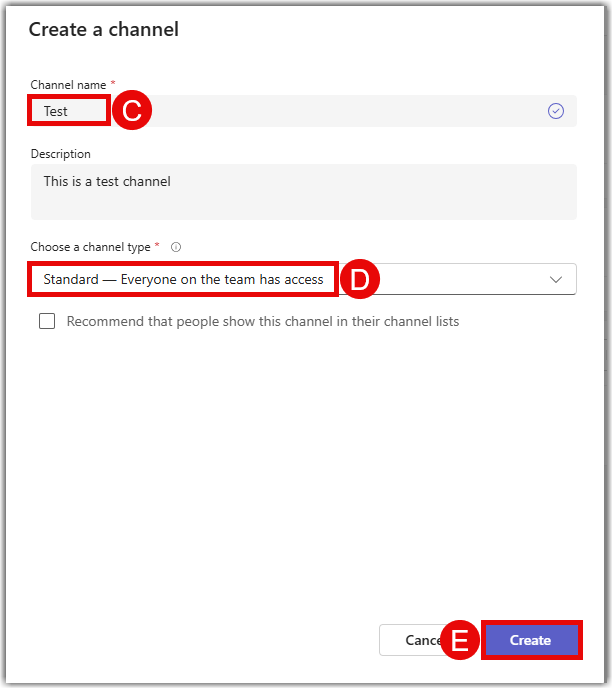
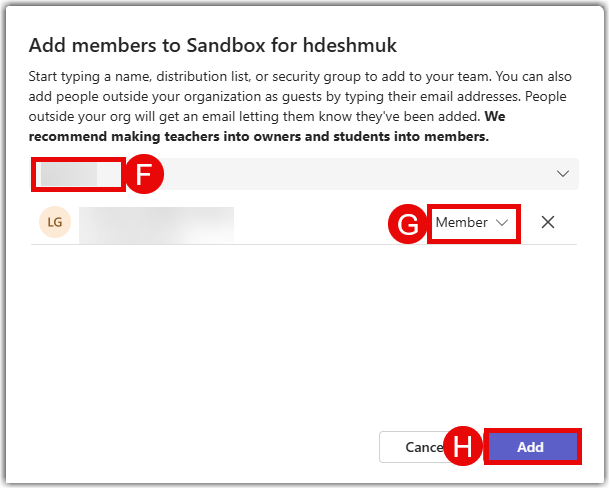
- Make sure you choose the channel type to be Private (D). Once you make the selection, proceed to create the channel (E)
- A window will appear which will allow you to add students by their name or their BlazerID (F). Once you find the student, be sure they are labeled as a member (G), and not an Owner, and click on the Add button in the bottom right corner (H). Unfortunately, this one-at-a-time process is the only way to add students to individual channels.
Notifying Students
Let students know where to find your course in Teams. Using BlazerNet, you can email them and direct them to your Teams Class.
Go to BlazerNet and select Enter BlazerNet. Scroll down to your course list.
There are two ways to email students: directly from BlazerNet or by accessing the roster and emailing them through Outlook. Use the second option if you want to format your email as you can in Outlook or attach documents.
Emailing the Whole Class Directly from Blazernet
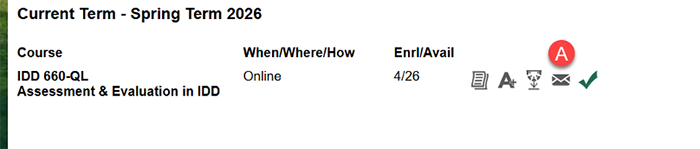
Select the email icon that looks like an envelope (A).
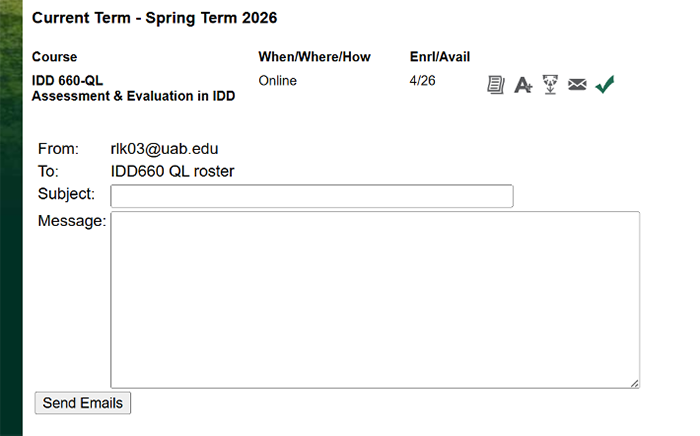
This will open a text box. Add your message and send to email the entire class roster. This provides a simple, plain text way of emailing students.
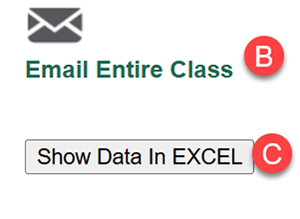
Access the Course Roster to Email the Whole Class through Your Email Client (such as Outlook)
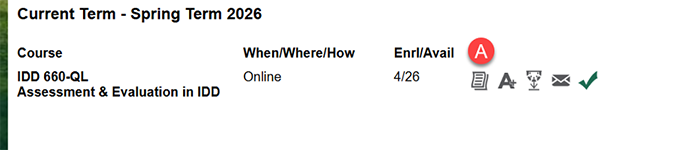
- Select the course roster icon that looks like a piece of paper (A).
- Scroll down past the list of students.
- Either select Email Entire Class (B) to open an email in Outlook with all students in the BCC field, OR select Show Data in Excel (C) to download the roster in Excel. If you download the Excel file, you can then copy and paste email addresses into an email.
Managing Notifications
Teams provides a lot of choice in the notifications you receive from activities in your Teams Class as well as other Teams. See Manage notifications in Microsoft Teams opens a new website.