 What is Pear Deck Tutor?
Pear Deck Tutor is an online education platform that provides on-demand tutoring. The Pear Deck Tutor platform enables thousands of tutors to share their knowledge with students around the globe. Pear Deck Tutor provides premium online tutoring for a number of subjects and connects students with live tutors 24 hours a day, 7 days a week. Pear Deck Tutor provides a virtual whiteboard, audio/video chat, screen-sharing, graphing calculators, and more. See more information about all tutoring services available at UAB.
Note for users of screen readers: letters in parentheses in the instructions below refer to corresponding areas on example images. If you have any questions about these instructions, contact eLearning for assistance.
How to Access Pear Deck Tutor
Note for users of screen readers: letters in parentheses in the instructions below refer to corresponding areas on example images. If you have any questions about these instructions, contact eLearning for assistance.
Access
Students at UAB are provided up to 3 hours per week with a 1-hour cap on each session. Students are not required to schedule an appointment with a tutor. Sessions are on demand by using the Pear Deck Tutor link inside of Canvas. Please follow these steps to access your free online tutoring within Canvas. Please note UAB students cannot access Pear Deck Tutor outside of Canvas.
- Log in to Canvas.
- Click Account (A) at the top left of the global menu navigation menu.
- Click Pear Deck Tutor (B) in the course navigation menu.

Please note: It is recommended that students log in to Pear Deck Tutor from Google Chrome for best results. Please ensure pop-ups are enabled in your web browser.
Student Expectations and Best Practices
- When connecting with a tutor, students must come prepared and provide a detailed description of the type of help they need and upload assignments and/or screenshots for the tutor.
- Students - Tutors will help you understand the concept and processes, but they will not provide answers or do the work for you. Any student that asks tutors to do the work for them or behaves in a disrespectful manner towards the tutors will be suspended from the platform.
Guides and Tutorials
FAQs
Instructor Questions
-
Who are the Tutors at Pear Deck Tutor?
Pear Deck Tutor has over 10,000 tutors. 78% of their tutors hold at least an advanced degree. Each tutor goes through 15 hours of training, quarterly reviews, and follows Pear Deck Tutor’s See more information below.
-
How does Pear Deck Tutor handle Academic Misconduct?
Here is a snippet from the Pear Deck Tutor Honor Code:
Pear Deck Tutor does not allow or participate in academic dishonesty in any form. Tutors are to work through students’ assignments with them. They will not complete tests or assignments, or simply provide students answers without the required work.
Pear Deck Tutor’s platform was developed to help connect teachers with learners. It is not a platform to exchange answers or completed assignments. Effective tutoring is more than simply giving out answers to questions. We encourage pioneering problem-solving approaches, helping students comprehend the methods required to find the answer instead of giving them the answer and working backwards.
All lessons and messages on the site are monitored, and any violation of Pear Deck Tutor’s academic honesty policy will result in suspension and review.
-
Who do I contact if I think a student is misusing Pear Deck Tutor?
If you feel that students are misusing Pear Deck Tutor, you can contact UAB eLearning, to start an investigation. This may result in suspending the student's Pear Deck Tutor account.
-
Can I review a student's tutoring session?
Yes, all tutoring sessions are recorded and archived. If you would like to review a specific tutoring session, please contact UAB eLearning and include the student and tutoring subject you would like to investigate.
Student Questions
-
What should I do if I reach my limit?
Students at UAB are provided up to 3 hours per week with a 1-hour cap on each session. Once this limit is reached, the following message will display.

Students who have reached their limit are encourage to seek out other tutoring services on campus.
-
What browsers are compatible with Pear Deck Tutor?
Students can use any recent version of a popular browser, but we highly recommend downloading Chrome for the best experience on Pear Deck Tutor.
However, to use audio/video features in the lesson space, you must have Chrome, Firefox or Safari 11. Screen sharing is only supported on Chrome.
-
What Subject Areas are available for Tutoring?
Pear Deck Tutor offers over 300 subjects. The categories include: Computer Science, Engineering, Foreign Language, History, Humanities, Math, Professional, Science, & Social Science. See complete list of all subjects here.
-
How do I connect with Chat Support?
- Select Pear Deck Tutor from the course navigation on the left.
- Click on the Chat Bubble at the bottom right corner of the Pear Deck Tutor home page.
-
How do I connect with a tutor I’ve previously worked with?
- Select Pear Deck Tutor from the course navigation on the left.
- Select the name of the tutor you have recently tutored with from the right-hand side of the Pear Deck Tutor home page. A chat box will appear where you can message and/or start a new lesson with the tutor.
Note: The dot to the left of the Tutor's name indicates if they are online or not. Gray means they are not online. Green means that they are online.
Note: If the tutor is currently in a lesson and you attempt to start a lesson, your lesson will be automatically rejected, but you can leave a chat for the tutor which they will see after their lesson is over.
-
Do I schedule a lesson?
Students do not need to schedule a time. Simply click the Pear Deck Tutor link inside of Canvas and fill out the prompts to be paired with a tutor.
Once you have worked with a tutor, you can simply send them a message through the chatbox and schedule a time that best works for both of you. You can schedule to be online at the same time as the tutor, and you can request a lesson directly from your chat box.
-
How do I upload a file?
You can upload a file through Pear Deck Tutor’s matching system, the chat box, and the file share tab in the lesson space.
Matching System
To upload a file through the matching system, follow the steps below.
- Search a subject or topic on the TutorMe homepage.
- Write a brief description of what you need help with, and click browse to upload a document from your computer.
File Sharing Tab
To upload a document using the file share feature while in a tutoring session, follow the steps below.
- Click on the file share tab in the lesson space.
- Click Upload.
Note: The file will be available for the student and the tutor to view and download.

Chat Box
To upload a document in the chat box in the lesson space, follow the steps below.
- Click on the attachment icon at the bottom of the chat box.
Note: The file will be available for the student and the tutor to view and download.

-
What if I have an issue with a Pear Deck Tutor?
Students can report a user via the gear icon on the chat box. Click here for more information. If you continue to have issues with using Pear Deck Tutor, please contact UAB eLearning.
Technical Support
Click the speech bubble at the bottom right of the Pear Deck Tutor screen to access Live chat or open a ticket. Pear Deck Tutor does not offer phone support. Learn more about chat support.
- Live Chat - Available from 9am-6pm, M-F
- Ticket - Any message sent via chat outside of technical support hours will be entered as a ticket.
- support@tutorme.com
Privacy and Accessibility
All documents must be UNEXPIRED. Students may present one (1) selection from the list below.
Please note: This list of identification options are approved for both ProctorU and Respondus LockDown Browser & Monitor.
- U.S. Passport or U.S. Passport Card.
- Permanent Resident Card or Alien Registration Receipt Card (Form I-551).
- Driver's license or ID card issued by a State or outlying possession of the United States, provided it contains a photograph or information such as name, date of birth, gender, height, eye color, and address.
- ID card issued by federal, state, or local government agencies or entities, provided it contains a photograph or information such as name, date of birth, gender, height, eye color, and address.
- Military dependent's ID card.
- Native American tribal document.
- U.S. Coast Guard Merchant Mariner Card.
- Driver's license issued by a Canadian government authority.
- School ID/Employer ID card with a recent photograph.
 What is Macmillan Learning?
Macmillan Learning is a high-quality publisher of textbooks and learning resources for university level students. Macmillan Learning develops relevant and impactful course content that serves the needs of educators and supports the success of today’s students.
How to Access Macmillan
Instructors
Macmillan Learning offers deep content integration between its LaunchPad products and Canvas. This robust integration creates direct links from a Canvas course into the Macmillan LaunchPad environment. Faculty can add Macmillan to their Canvas course by adding the link to course navigation. Once installed, instructors will have the option to add links to Macmillan content from various points in their Canvas course.
Students
Before you can use Macmillan Launchpad, you will first need to connect your Canvas account with the Macmillan LaunchPad application. For detailed instructions, see the Student guides listed below.
Macmillan Guides and Tutorials
Instructors
Guides
- New Interactive Guides Available in LaunchPad
- Enable the Macmillan Learning App in Canvas
- Using Macmillan Course Tools in your Canvas Course
- How to Create a LaunchPad Assignment
Tutorials
Macmillan FAQ
-
How do I get access to LaunchPad?
- Create an account with Macmillan Learning.
- On the LaunchPad Homepage of the Macmillan catalog, click Instructors – Find Your Course.
- Search for your title by entering your author’s last name or your products title.
- Click “Go to product”.
- At the bottom of the screen, enter your email address and click Get Access.
-
How do I activate my course so students can enroll in it?
- Before you activate a course, you must create it and make all customizations necessary for the semester.
- You can activate your course from the dashboard or within the course.
- You can activate from your dashboard by clicking Activate beneath your course title.
- To activate from within the course, click the Activate this Course button that appears in the yellow banner toward the top of your LaunchPad home page.
-
How do I find my course ID or course URL?
Every course that you create has a unique course ID. This holds true whether you create a course from scratch, copy a course from another course, or branch a course from a master. When you direct your students to enroll in your course, you should give them the entire course URL, which contains the ID as a string of numbers at the end. Doing so will ensure your students enroll in their correct course so that you can track their work.
- Go to your instructor dashboard.
- Select Switch/Create Courses from the top right under your name.
- Locate the course name under My Courses.
- The URL is located directly under the course title and the ID is located under the URL.
Macmillan Technical Support
- Contact Macmillan Learning Support
- +1 (800) 936-6899
Macmillan Privacy and Accessibility
As a meeting host, you can split your meeting participants into breakout rooms when scheduling the meeting. This can be useful if you already know how you want to split up your participants.
Notes:
- Only 200 participants can be pre-assigned in Zoom meetings.
- If you start the meeting from the Linux client or Zoom Mobile App, you will not be able to see your breakout rooms with pre-assigned participants.
- In order for pre-assigned breakout rooms to work, attendees will need to sign in to their Zoom account associated with the email placed in the CSV upload.
- If you have registration enabled and external participants register for the meeting, you need to assign them to breakout rooms during the meeting.
Note for users of screen readers: letters in parentheses in the instructions below refer to corresponding areas on example images. If you have any questions about these instructions, contact eLearning for assistance.
Enable Pre-Assign Breakout Rooms & Authentication
IMPORTANT NOTE
Pre-assigned breakout rooms only work if the users sign in to their Zoom account associated with the email provided on the pre-assignment. One way to make sure that users sign in is to require authentication for your meeting. This makes is so that anyone that is not signed in to their Zoom account when clicking the join link will be prompted to sign in in order to gain access to the meeting.
Students must sign in using SSO (Single Sign On = BlazerID/Password). Here is a guide on how to sign-in to Zoom on phone or computer when joining a meeting.
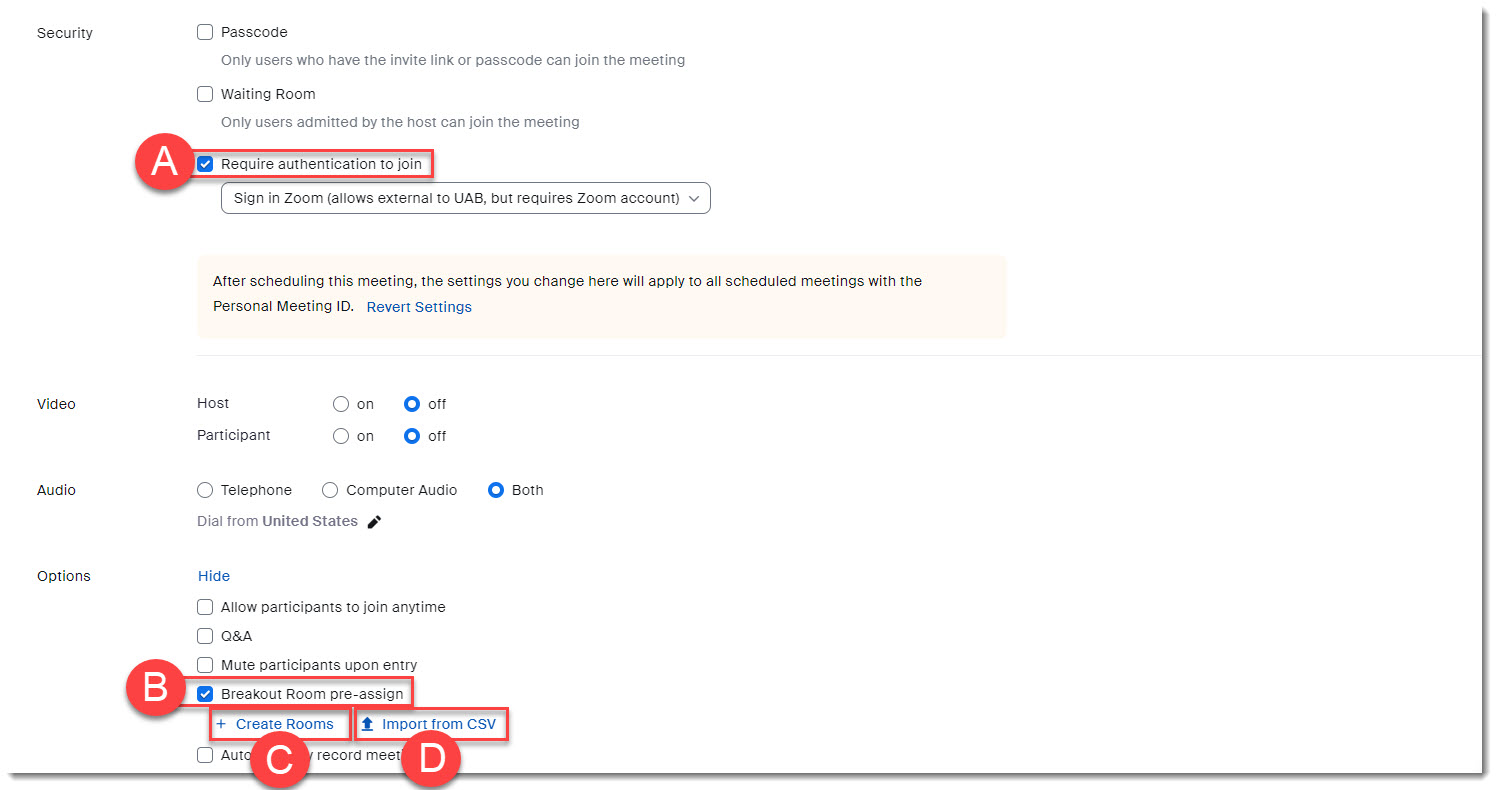
- When scheduling your meeting, check the box for Require authentication to join (A) in the security section and choose which authentication you want to accept (anyone with Zoom account or just UAB Zoom accounts).
- Check the box for Breakout Rooms Pre-Assign (B) under the options section and choose which method you would like to use to pre-assign breakout rooms.
- Create Rooms (C) allows you to use the Zoom interface to create rooms and assign people by typing in their @uab email address. This option will only allow you to type in email addresses of users that have created a Zoom account with UAB.
- Import from CSV (D) allows you to create an worksheet with the desired group names and emails and upload it for pre-assigning. This option allows you to assign users internal and external to UAB.
Pre-Assign Breakout Rooms — Web Portal Option
You can create breakout rooms, name the rooms, and assign users through the Zoom Web portal. Note: When pre-assigning participants using the web portal, you can only pre-assign internal Zoom users that are in the same account (@uab.edu email addresses).
- Click + Create Rooms shown in the previous step to open up the Pre-assign web portal.
- Click the + (A) button beside Rooms to add breakout rooms [limit is 50].
- Hover over the room and click the trash (B) icon to delete a room.
- Hover over a room title and click the pencil (C) icon to change the name of the room.
- Add Users (D) to a room by typing their name then clicking the full name that appears in the list.
Note: If a user does not appear here, they do not currently have a Zoom account with UAB. You can direct the user to create their account or you can use the Import from CSV option.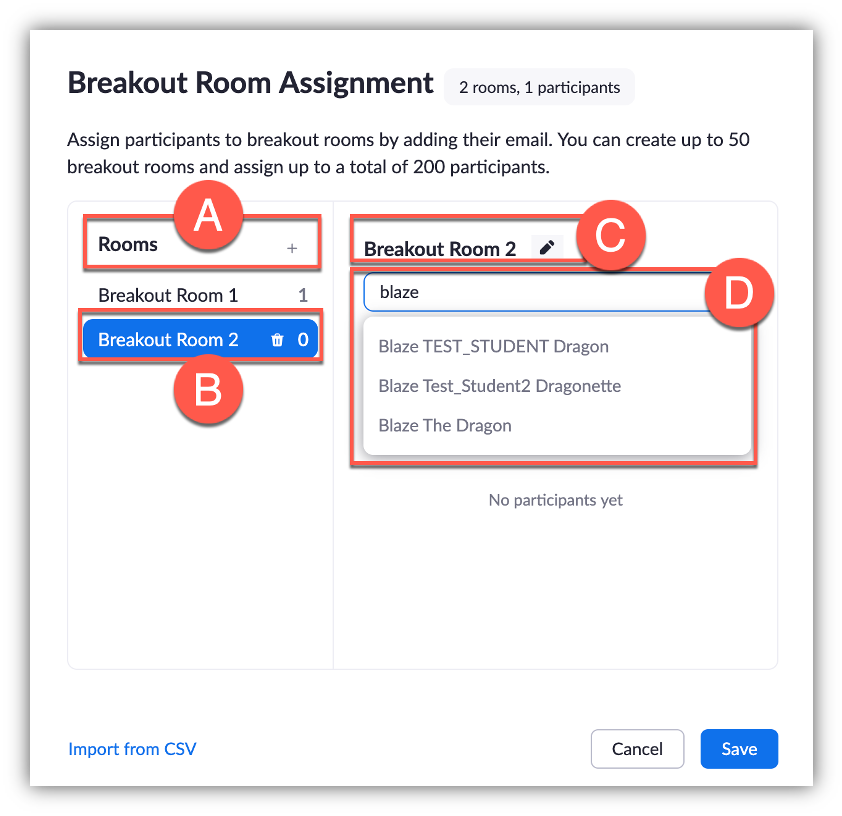
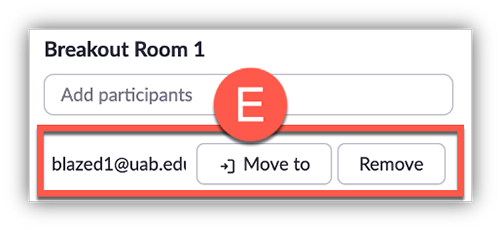
- Hover over an assigned participant to see the option to Move or Delete assignment (E).
Pre-Assign Breakout Rooms — Import from CSV Option
PLEASE NOTE
- Use @uab emails for users internal to UAB
- Emails should be all lowercase
- Some users have alias’s instead of blazerid@uab.edu. Check the UAB Directory to know what a user’s email is.
- The file must be saved as a Comma Separated Values (CSV) file which can be found in the Save as file options.
- Click the Import from CSV option to pull up the CSV interface shown in the previous steps.
- Download the template CSV (A) worksheet to see the example.
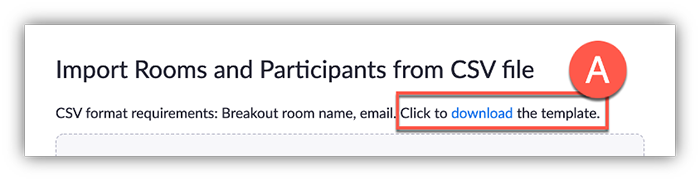
- Fill out the template placing the breakout room name (B) in column A and the participants email (C) in column B.
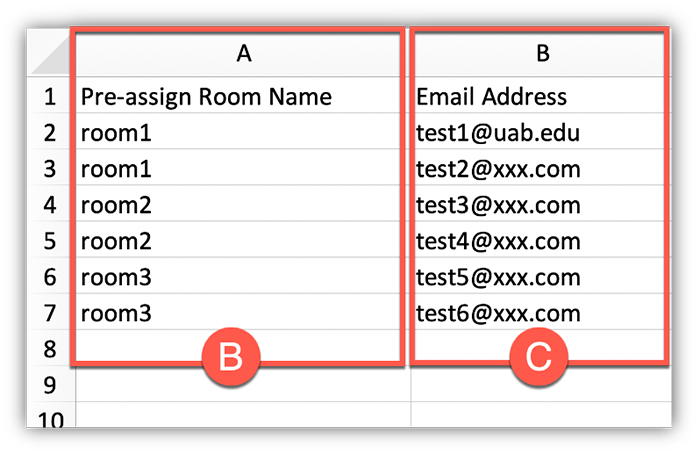
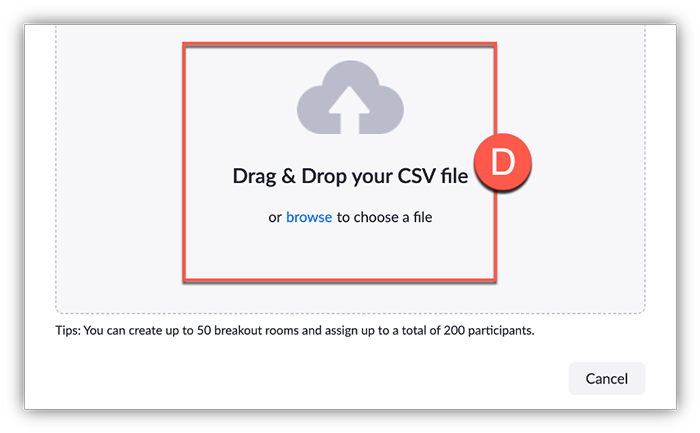
- When you have finished filling out the CSV, drag that file into the upload area or click browse (D) and select the file.
- Refer to the Web Portal section of this guide to make any adjustments to breakout room names or assignments, then Click Save when finished.
Start Breakout Rooms
- Click Breakout Rooms (A) in the meeting controls to access the breakout rooms you created. You may have to click 'More' (three dots) in order to see Breakout Rooms button. This button is only visible to the Host of the meeting.

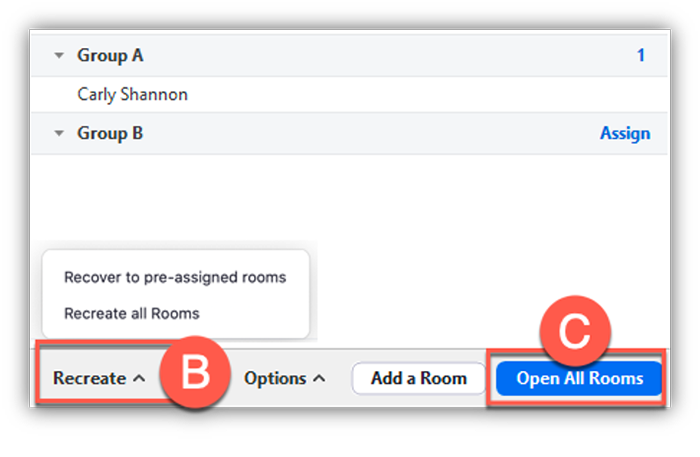
- If a participant is not automatically assigned to the breakout room you specified when scheduling the meeting, click Recover (B) to re-assign participants to their pre-assigned breakout rooms. You can also manually assign users.
- Click Open All Rooms (C) to open the rooms and send the pre-assigned users to their groups.
Learn more about Managing Breakout Rooms.
![]() Packback is an AI-supported online discussion platform that enables curiosity-based student discussion. Learn more about Packback on their overview webpage.
Packback is an AI-supported online discussion platform that enables curiosity-based student discussion. Learn more about Packback on their overview webpage.
Features:
- Algorithmic Moderation
- Instant Quality Rating
- Real Time Coaching
- Post Recommendations
- Custom Feedback
- "Smart" Feed Sorting
- Counter and Supporting Points
- Professor Tools
Pricing
- How pricing on Packback works: The Packback Questions discussion platform is priced on a per-community basis. Communities on Packback are created for each class that is using Packback Questions. This fee is often paid by the student when registering for their discussion community; however, departments and universities may choose to pre-pay for their students.
- The Curiosity Credits Program: Each time a student purchases a Packback community, they earn $3 of Curiosity Credits. The credits are applied toward future community purchases, up to a maximum of $15 off. The students’ Curiosity Credits do not get spent. They are an earned discount that applies at checkout on all of their future communities!
Learn more about Packback pricing.
How to Access Packback
Instructors
All instructors have access to use Packback inside of the Canvas Learning Management System (LMS). Instructors can add Packback Questions to their Canvas course navigation and access it from this link. See how to enable Packback in your course.
Students
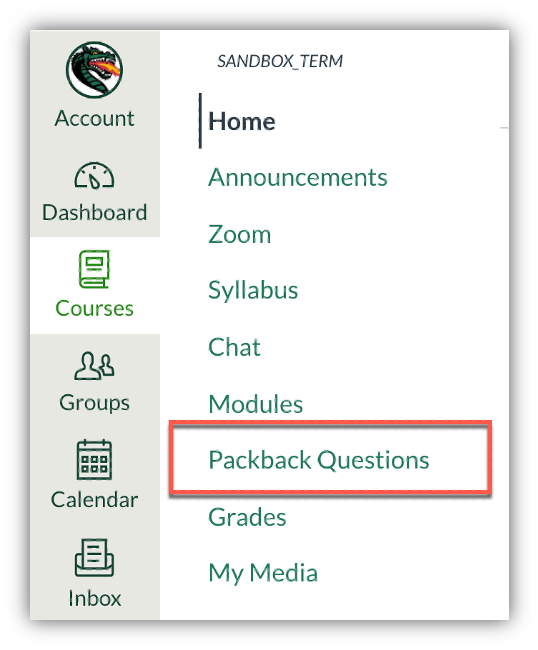
Students have access to Packback when an instructors chooses to use it in their course. Access Packback by clicking Packback Questions in your Canvas course navigation.
Guides/Tutorials
FAQ
Q: What can I use tell students about Packback?
Q: How can I adjust email notifications?
Q: Why is my post missing from the community?
Instructor Training
Strategy Consultant Nick Petrella (nicholas.petrella@packback.co) brings on new professors, helps them create their communities, develops a plan for Packback in their course (grade allocation, weekly expectations).
Experience Manager Christa Hein (christa.hein@packback.co) is UAB’s Packback point-person/online TA. Works with professors throughout the term, sets up check-in calls, helps with grading, logistics, professor questions.
Privacy & Accessibility