Automatically scheduled classroom lecture recording is available at UAB for rooms with Lecture Capture equipment. Lecture Capture equipment is installed in rooms with a capacity of 22 or greater and are designated as classroom for primary use in space management.
How to Access Lecture Capture Opt-in
Faculty can access the Classroom Lecture Capture opt-in page from BlazerNet. Opting in to Lecture Capture for a course will schedule automatic recordings of all scheduled class sessions.
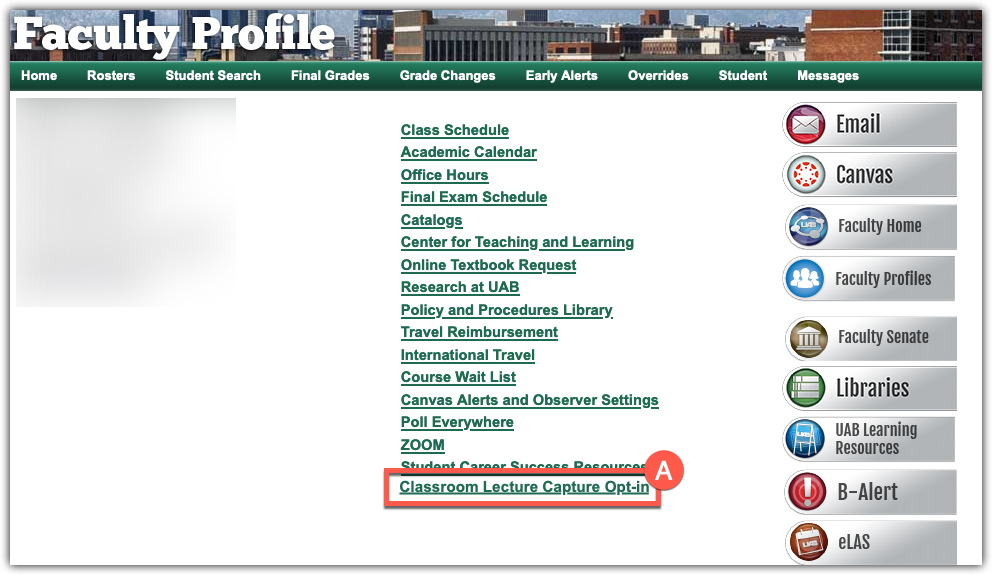
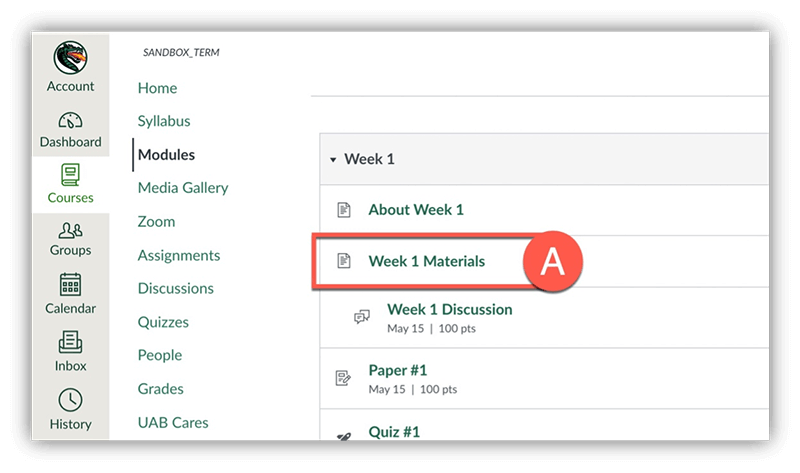
- Login to BlazerNet. Choose Classroom Lecture Capture Opt-in (A) from the middle menu.
- Classes scheduled in the same place and time are grouped for the purposes of recording. Decisions to record or stop recording apply to all classes in the group. Locate the class or group of classes you wish to record (A). Verify that the room, times, and of the days of week are correct (B). Fill in the check box for each class or group of classes you would like to record automatically. When done opting in for courses, click Submit (C).
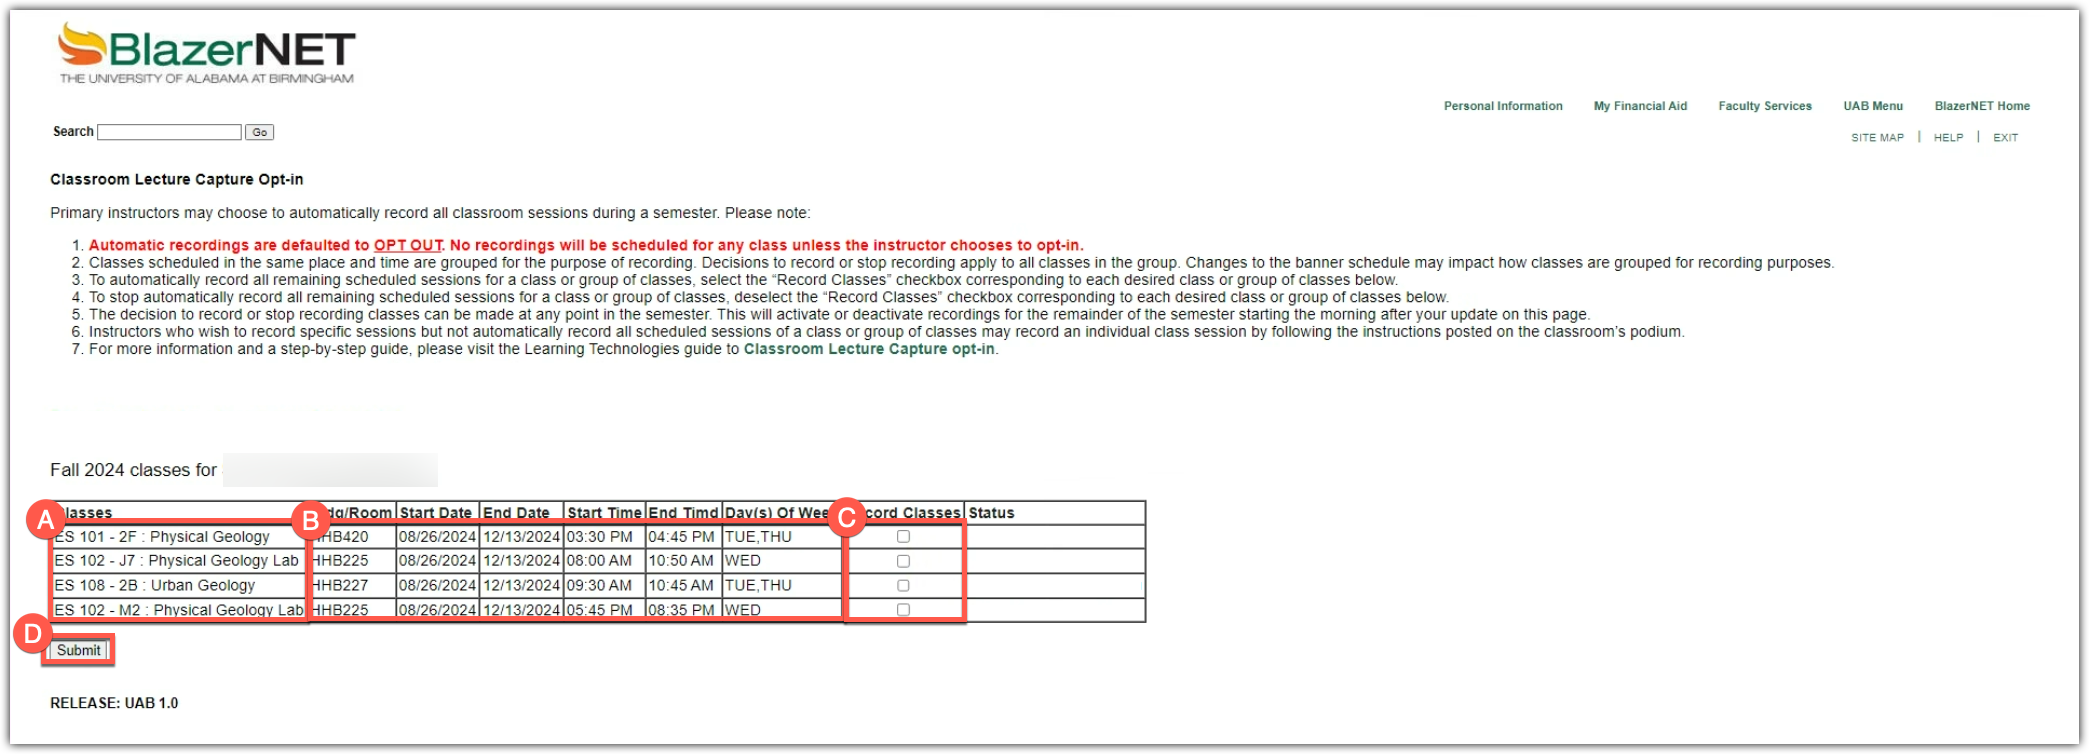
- The message Recording options have been successfully updated will appear (A). The status for the class(es) will change to Opt-in request pending and your recordings will be scheduled overnight. Recordings will begin according to the class schedule the next morning.
Changes made to a course's automatic Classroom Lecture Capture status on this page will take effect the early the next morning. Please submit an Ask OLT request with any questions.
FAQ
-
What do the statuses mean?
- Opt-in Request Pending: Opt-in for Classroom Lecture Capture successful. Automatic recordings will start according to the class schedule in BlazerNet beginning the morning after opt-in.
- Opt-out Request Pending: Opt-out for Classroom Lecture Capture successful. Automatic recordings will stop the morning after opt-in. If class is in session the day of opting out, the course will be recorded.
- Recordings Added to Schedule: Classroom Lecture Capture automatic recordings have been opted in to prior to today. Automatic recordings are taking place according to the class schedule in BlazerNet.
- Recordings Removed from Schedule: Previously scheduled recordings have been canceled. No automatic Classroom Lecture Capture Recordings will take place for this course.
- A blank status column indicates that no recordings are scheduled or have been scheduled for this course.
-
When will recordings start after I opt-in?
Automatic Classroom Lecture Capture recordings will start the morning after you opt-in. The scheduling program runs every morning at about 4 am. Once recordings are scheduled, the recording will start automatically according to the schedule in BlazerNet.
-
How can I use Classroom Lecture Capture videos?
Classroom Lecture Capture videos are stored in UAB's multimedia content management system Kaltura which is integrated into Canvas. Kaltura video can be embedded or published to Canvas courses or shared outside of Canvas.
-
Why did my course list change on the opt-in page?
The course list on the Classroom Lecture Capture opt-in page pulls your course list from BlazerNet. Classes scheduled in the same place and time are grouped together for the purposes of recording. Your courses may have changed place or time, which would change the group.
-
Why is my class is not listed on the opt-in page?
Classes will be listed on the opt-in page of the primary instructor of record if the class is located in a room with Classroom Lecture Capture available. Please check the Classroom Lecture Capture room list to see if your class location has the required equipment.
Check if any co-instructors of the class are able to opt-in to Classroom Lecture Capture. If you still have questions, please Ask OLT request. -
How can I select specific class sessions to record?
Opting-in to Lecture Capture will enable automatic recording for every regularly scheduled class session for a course. To record specific class sessions or class sessions not on the BlazerNet class schedule, please follow the instructions on the podium computer to start ad-hoc recordings.
Technical Support
- Contact the Office of Learning Technologies for issues with scheduling Classroom Lecture Capture.
- (205) 934-7217 (4-7217 on campus)
- Submit a OLT Request
A professional video capture software is available on UAB classroom computers and can be used to recording lectures manually. Use this guide to start/stop an ad-hoc recording on the classroom computer.
Note for users of screen readers: letters in parentheses in the instructions below refer to corresponding areas on example images. If you have any questions about these instructions, contact Learning Technologies support for assistance.
Step 1 – Open Kaltura Classroom & Sign in
- Type Kaltura (A) in the search bar at the bottom left of the desktop and click the Kaltura Classroom (B) app to open.

- It may take a minute to open and appear on the desktop. If Kaltura Classroom does not appear when searching, contact AskIT and your local IT support group to have it installed.
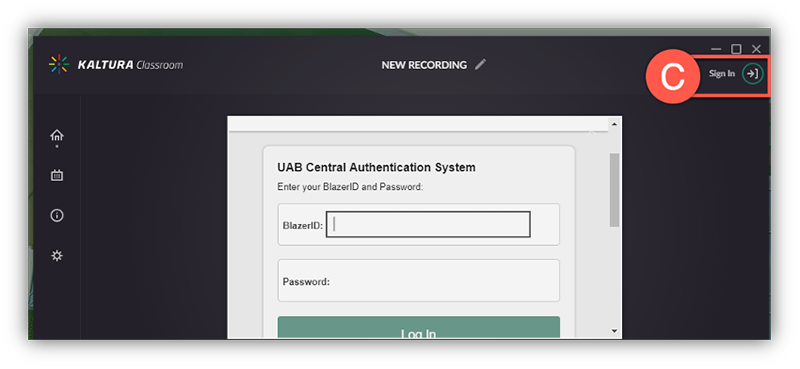
- Click the Sign-in (C) icon at the top right, type your BlazerID and Password, and complete Duo-Authentication.
Step 2 – Confirm or Set Desired Inputs
Before starting the recording, it is important to ensure that your desired video and audio inputs are selected.
- A preview (A) displays the currently selected inputs for Primary video, secondary video, and audio.
- To change the selected inputs:
- Select the Primary Input Settings (B) icon for your primary video.
- Select the desired input option (C).
Tip: Users usually want this to be their screen which is where their presentation or other items may be shown. - Click Back (D) to save the input selection.
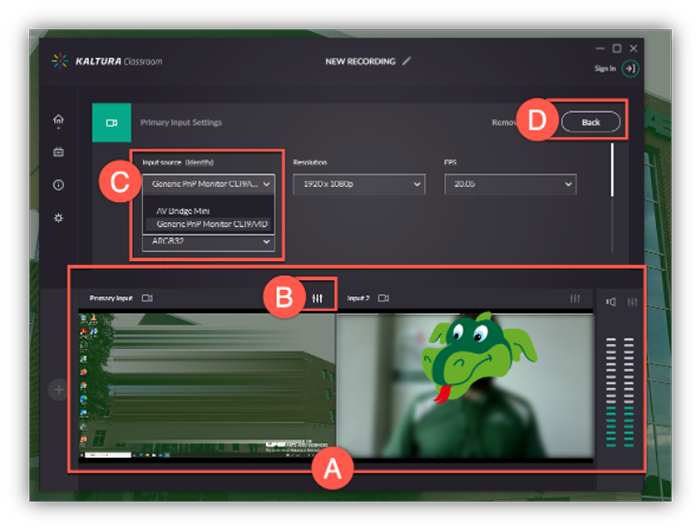
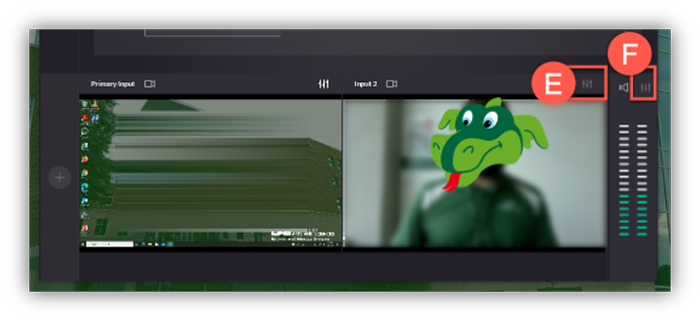
- Repeat this process to change the secondary video input (E) and Audio (F) input selections.
Step 3 - Start Kaltura Classroom Recording
- When you are ready for the ad-hoc recording to begin, click the Red Circle.
 Note: If you have not already signed-in, it will require you to provide your BlazerID/Password and complete DUO before the recording will begin.
 - A timer will count down from 5 to 1 and the recording will begin. The Kaltura classroom application will disappear and continue to run in the background.
Step 4 - End and Save Recording
- When you are ready to end the recording, you will need to pull up the Kaltura application. You can find Kaltura in the Task tray arrow (A) at the bottom right of the computer or search for the app from the start menu at the bottom left as you did when you opened it.
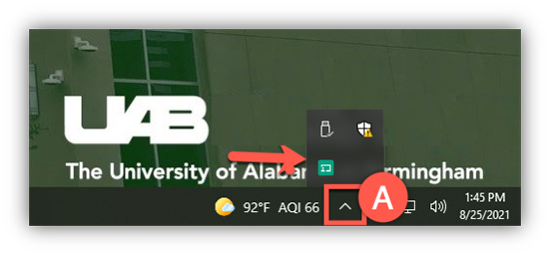
- Click Stop (B) to end your recording. Note that users can pause/resume (C) or cancel/delete (D) recording.

- An edit screen will appear with the default name “Kaltura Classroom Recording [Today’s Date/time]. Change this name (E) if desired and click Save (F). The video will upload to your My Media folder in Kaltura where it can be edited and published to students.

Instructors may choose to provide access to Class Recordings in one of the following ways. Please refer to your specific course syllabus or contact your instructor directly if you have specific questions on how to access recordings.
Note for users of screen readers: letters in parentheses in the instructions below refer to corresponding areas on example images. If you have any questions about these instructions, contact eLearning for assistance.
Media Gallery
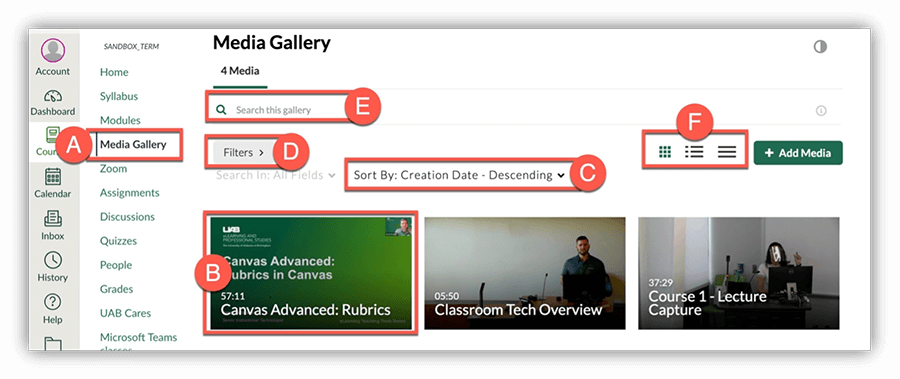
Instructors may publish videos to the Canvas course Media Gallery. The Media Gallery is a course specific gallery of videos that can be searched, filtered, and sorted.
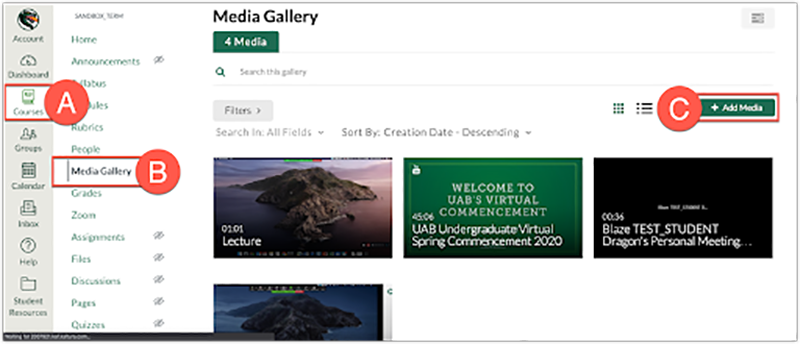
- Click Media Gallery (A) in your Canvas course navigation.
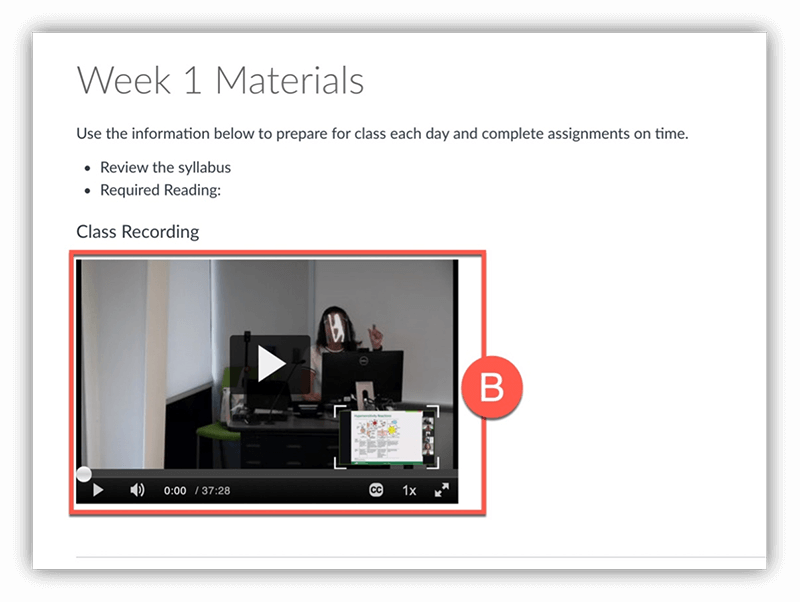
Note: If Media Gallery is not listed in your course navigation, your instructor may have chosen another method of sharing videos in your course. - The top left video is the most recent uploaded video. Click the thumbnail (B) to watch the video.
- Students can:
- Sort (C) the list of videos by creation date, alphabetical, or plays
- Filter (D) the list of videos by media type, captions, duration, or upload date.
- Search (E) videos by keyword. This will search the title, description, tags, and captions.
- Change the View (F) to Grid, Detailed, or Collapsed view.
Embedded Videos
Instructors may choose to embed videos in specific places across the Canvas course.
- Locate and click the page (A) or area your instructor has embedded the video. This is often found in your course modules.
- Click the thumbnail (B) to play the video
This guide covers the basics of teaching with UAB’s Lecture Capture system. For more in depth information on Lecture Capture, please search the classroom technology table to find your specific room.
Step 1 - Automatic Recording
- No action is necessary to start or stop the recording. Recording will start and stop using the class times posted in Banner for classrooms found in this searchable table
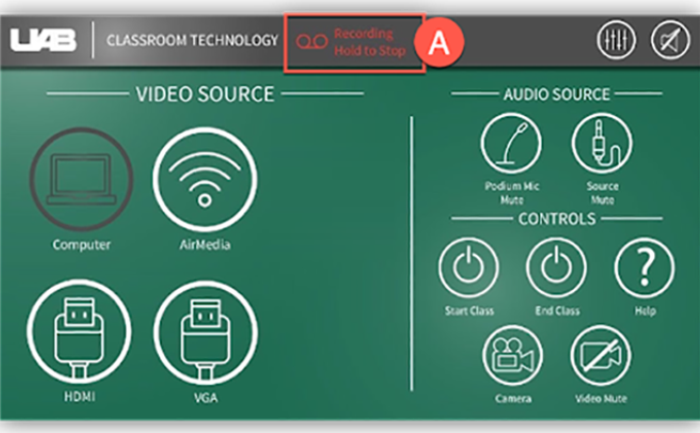
- Instructors can confirm their lecture is being recorded by the red indicator displaying at the top of the Crestron touch panel
- Press and hold this red Recording indicator (A) at any point to end that specific recording
Please note: Users can manually record their lectures to provide redundancy in case of equipment errors by using Zoom Cloud Recording or Kaltura Classroom software.
Step 2- Teaching
- Using the classroom Lectern computer to present materials is recommended
- 3 feeds are captured in the recording:
- Audio - Professional Microphones
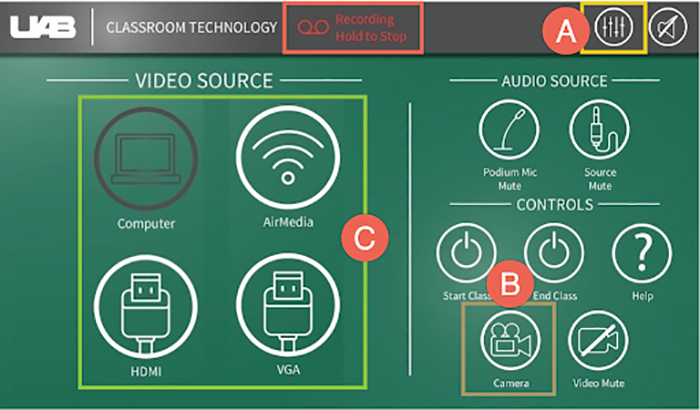
(Gooseneck, Lapel/Wireless (if available), Ceiling microphones, Computer audio)- Change the volume of inputs/outputs using the Audio level (A) icon.
- Video – Classroom Camera (Hanging from the ceiling)
- Change what the camera is pointing at using the Camera (B)icon on the Crestron touch panel
- Content - Anything presented to projector
- Change what is being projected by choosing your desired Input (C) (Computer, HDMI, VGA, AirMedia)
- Audio - Professional Microphones
Step 3- Sharing
- Video will appear in primary instructor’s My Media in Canvas
- This video is private to that instructor until action is taken
- Instructors can request auto-generated captions, edit (trim/clip), and adjust video details (name, description, tags)
- Share the video with the entire class by navigating to the desired course (A), going to the Media Gallery (B) and adding the video (C) to the Media Gallery.
Please note: Instructors can also share the video with specific users by adding the individual(s) as Co-Viewers in the Collaboration tab. See guide for more information.
Find additional training and support
- Find more information, guides, and videos on UAB eLearning’s Lecture Capture webpage
- If instructors have any issues with the equipment in the classroom, please contact the local support group (if applicable) or AskIT
- If a recording does not display in your My Media, contact AskIT at (205) 996-9999 (6-9999 on campus) or visit uab.edu/techhelp
This information is specific to small classrooms with a HuddleCam all in one webcam. Equipment may vary in these rooms as they are not set up in the standard fashion. Visit the Classroom Tech page, if you are unsure which category your room fits in.
Small Classroom with HuddleCam Tech Highlights
Review the information and FAQs below to see what type of equipment is available in these rooms.
Camera |
Whiteboard Options |
Live Stream |
Recording |
|---|---|---|---|
|
|
|
|

Classroom Tech FAQs
Note for users of screen readers: letters in parentheses in the instructions below refer to corresponding areas on example images. If you have any questions about these instructions, contact Learning Technologies for assistance.
Recording
-
How to start and stop recording
This room is not equipped with a lecture capture device but has a HuddleCam all-in-one Webcam that can be used in a Zoom meeting. To capture (record) your lecture, bring your laptop, plug the HuddleCam into your computer, start a Zoom meeting, and record the meeting to the cloud.
-
What is recorded in Zoom recording video?
The Zoom recording contains the audio and video captured by the HuddleCam webcam in addition to any content you choose to share through Zoom such as your screen.
-
How do I make sure I am heard?
The microphone is on top of the HuddleCam webcam and is omni-directional, meaning it can pick up audio coming from all directions. Make sure you are close to the HuddleCam so that your audio is picked up.
-
How do I see and share lecture capture or Zoom recording videos?
Zoom meetings that are recorded to the cloud are automatically uploaded to the instructors My Media (Kaltura) account. The video is private to that instructor until action is taken to embed/publish to a Canvas course.
-
How do I enable Harmonize Brainstorm with ChatGPT to create discussion prompts?
On the topic edit page, you'll see a banner at the top of the instruction's section. Click on the "Let's Brainstorm" button to get started. For more information, review the Using Harmonize Brainstorm with ChatGPT to Create Discussion Prompts guide.
-
How do I set up the HuddleCam all-in-one webcam/mic/speaker for class?
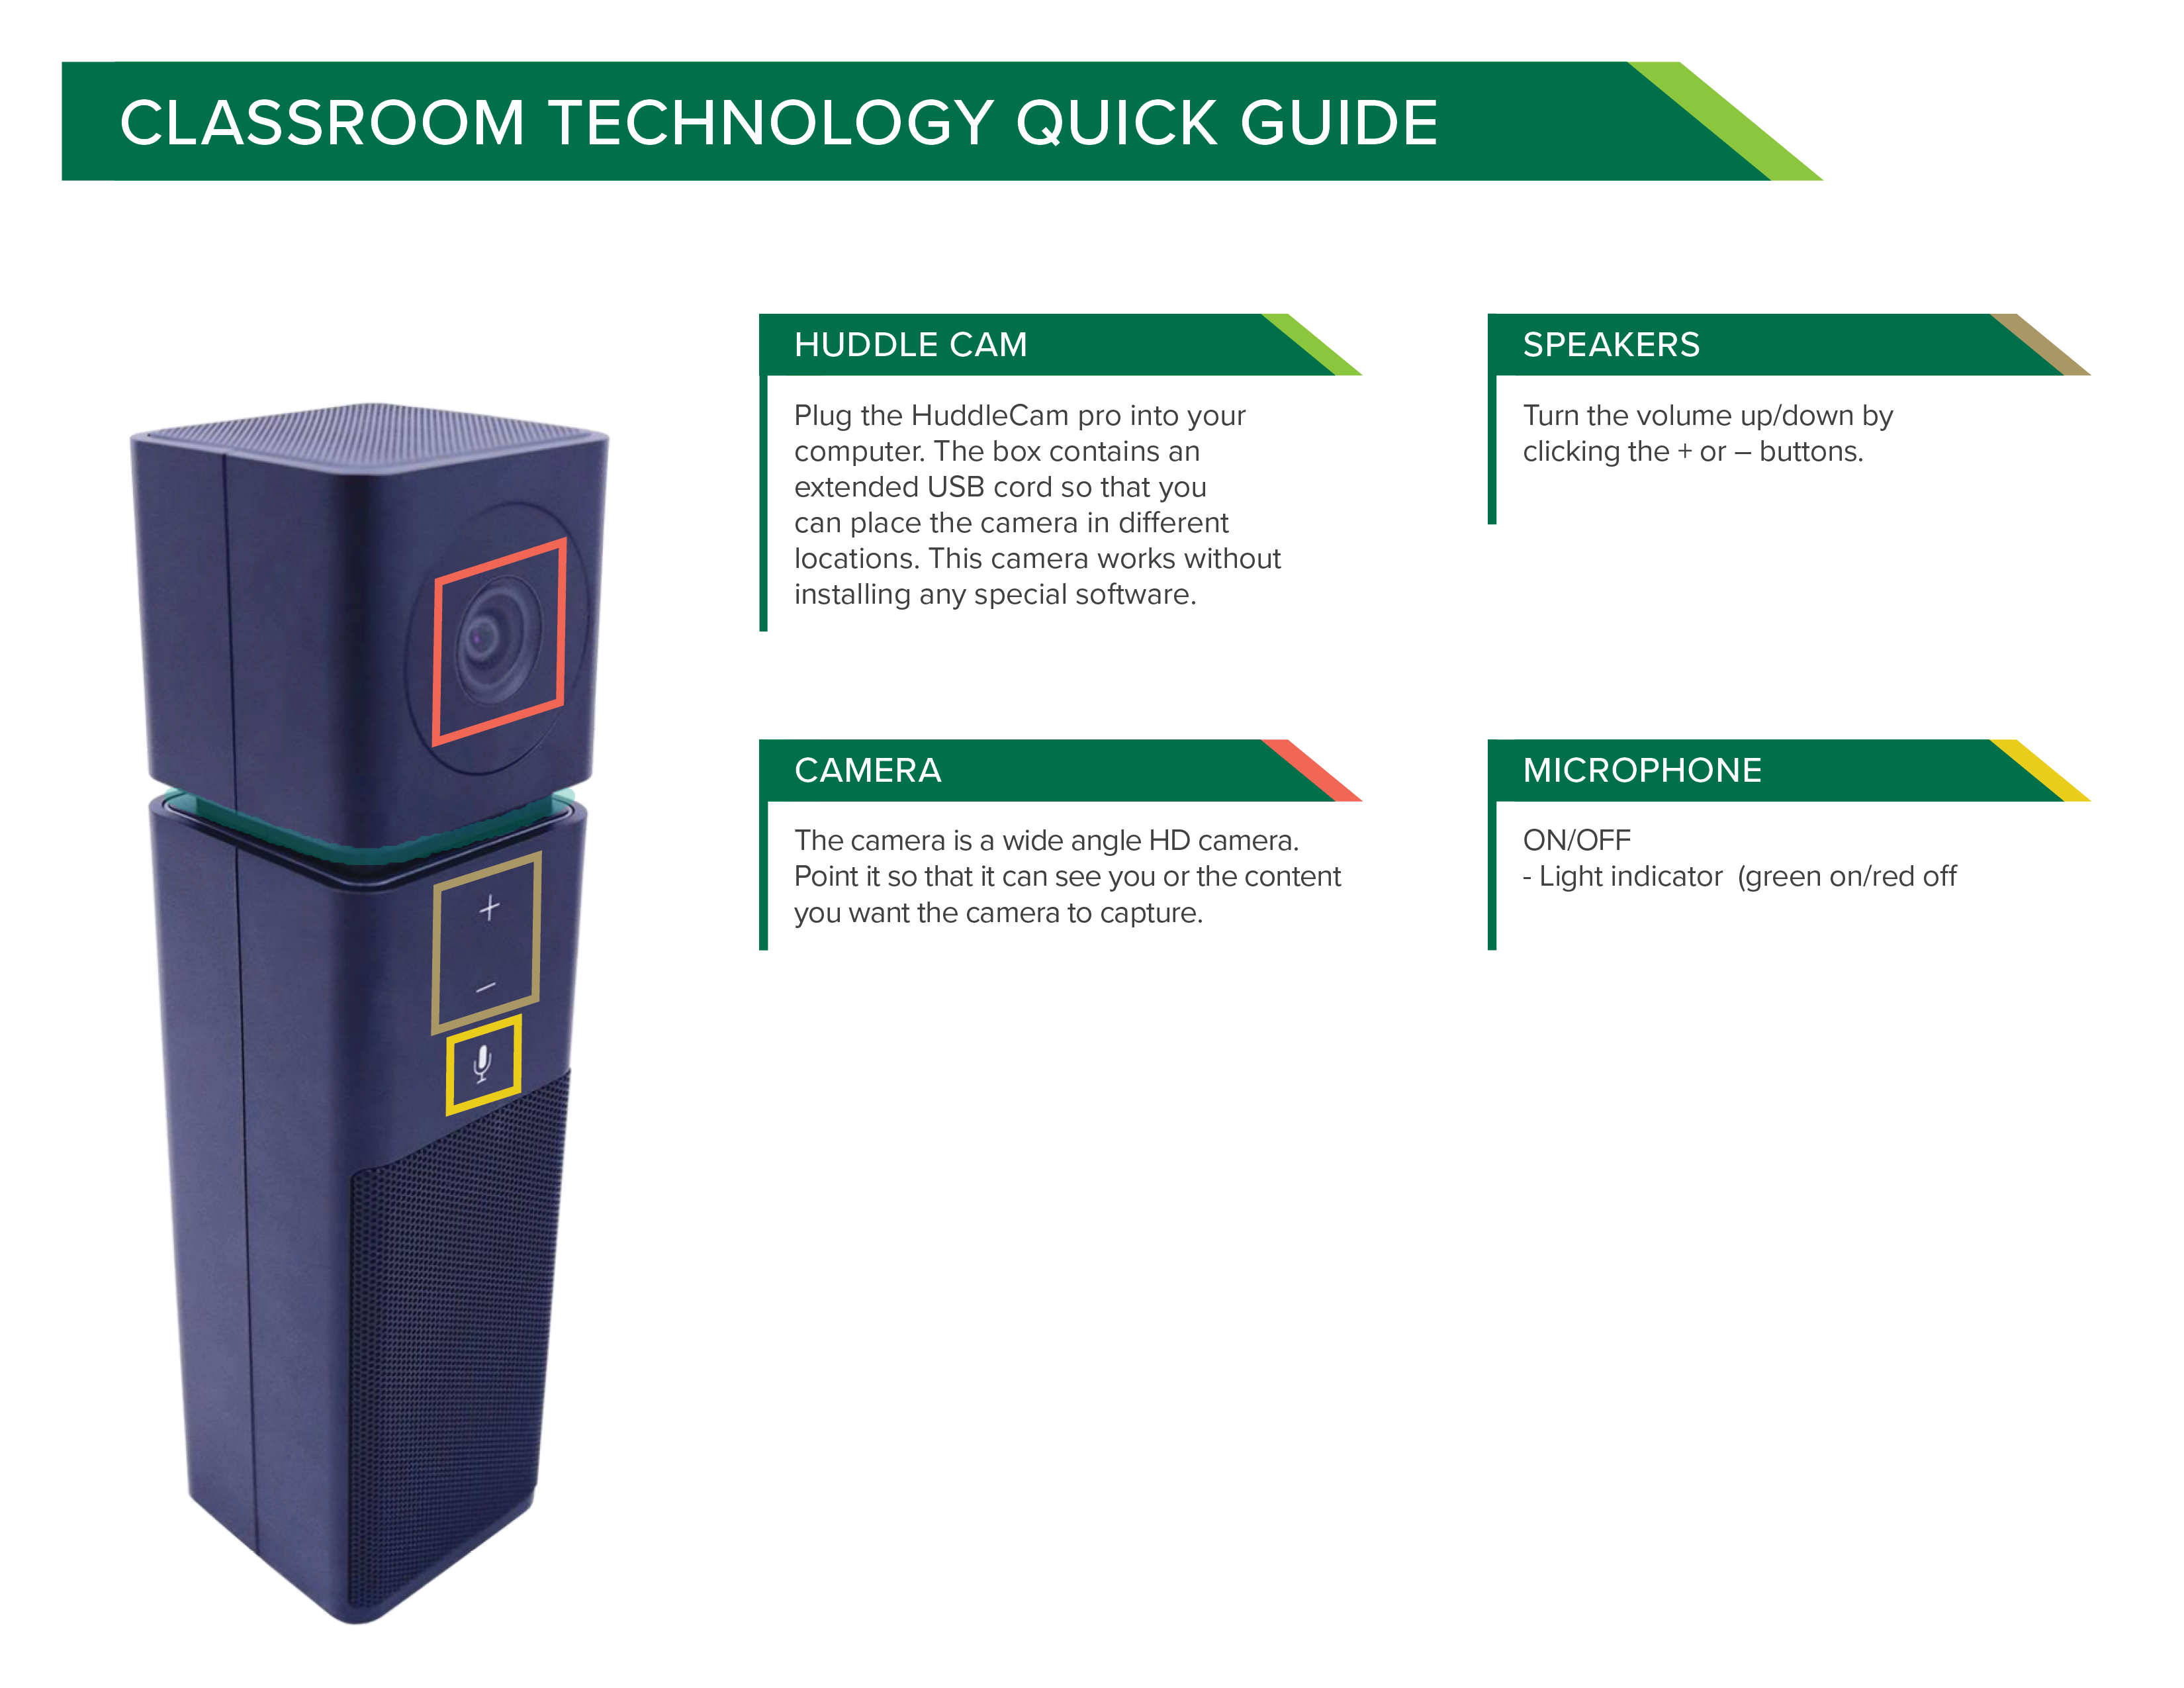
This classroom is equipped with a HuddleCam that acts as the class camera, microphone, and speaker all in one. See the information below to help you set up for class.
Plug In
Plug the HuddleCam pro into your computer. The box contains an extended USB cord so that you can place the camera in different locations. This camera works without installing and special software.
Microphone
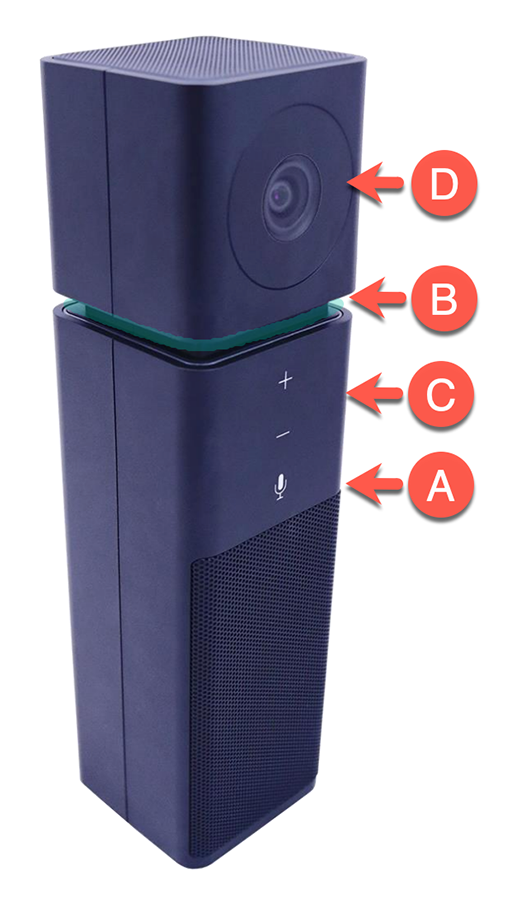
- Click the Microphone icon (A) to turn On/Off the microphone.
- The Audio status light (B) shows the status of the microphone. Green is on, Red is off
Speaker
Turn the volume up/down by clicking the + or – buttons (C).
Camera
The camera (D) is a wide angle HD camera. Point it so that it can see you or the content you want the camera to capture.
Recording
To record, start a Zoom session and select the HuddleCam (HC-GO) as the mic, speaker, and camera. Then record the meeting to the cloud.
See the HuddleCam full manual (pdf) for more information.
-
How do I show the Document Camera?
If there is a document camera in the room, make sure it is plugged into the computer and powered on. To show the document camera on the projector and recording, make sure you are showing the Lectern Computer on the projector, then double click the Document Camera icon on the computer desktop screen. This will open the document camera software on the computer screen which is being projected to students in the class and being captured by the automatic recording. Please contact your local IT department or AskIT if you do not have the document camera software on your computer.
-
What virtual whiteboard options do I have?
Though there may be a whiteboard in the classroom, instructors may want to consider using an alternative method so that both remote and in-person students can see it live and/or in the recording.
- Document Camera: Instructors can double click the ‘Document camera’ icon on the desktop to use the document camera feed on the computer screen. Instructors can display documents, sketch/write notes, or use their own small whiteboard under the document camera. This software comes with digital annotation features as well. See Document Camera Instructional Guide (pdf).
- Zoom Whiteboard: Instructors can click ‘share’ and choose ‘whiteboard’ in Zoom. This brings up a white window and Zoom’s annotation toolbar which allows drawing, highlighting, inserting shapes, typing text, using stamps, and more. Zoom also allows remote students to annotate on your whiteboard. See Zoom Guide on using Whiteboard.
- Microsoft Ink: Instructors can Select ‘Windows Ink Workspace’ from the lectern taskbar to open it. From here, you can select ‘Whiteboard’ or ‘Fullscreen Snip’. Microsoft Ink allows you to share a link with students so they can also write on your whiteboard. See Microsoft guide on Ink.
- Microsoft OneNote: Instructors can navigate to their OneDrive at office.com or open OneNote on that computer and use its drawing features. With this method, instructors can pre-write problems, figures, etc. and finish it during class. All work is synced to their OneDrive. See more information on Microsoft OneNote.
-
How do I show the physical whiteboard to remote students and the recording?
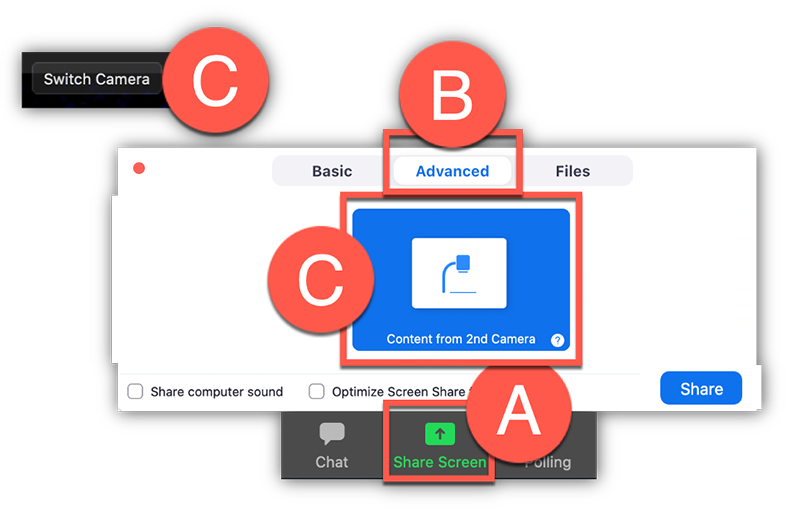
Place the HuddleCam in a location where it can see the whiteboard. Make sure that you have selected HuddleCam as your camera option in Zoom and that you are recording your Zoom meeting. See instructions below on how to share the camera as your content.
- Click Share (A).
- Click the Advanced (B) tab at the top.
- Choose Content from Second Camera (C).
- If it is showing the wrong camera, click Switch camera (D)
Live Meetings
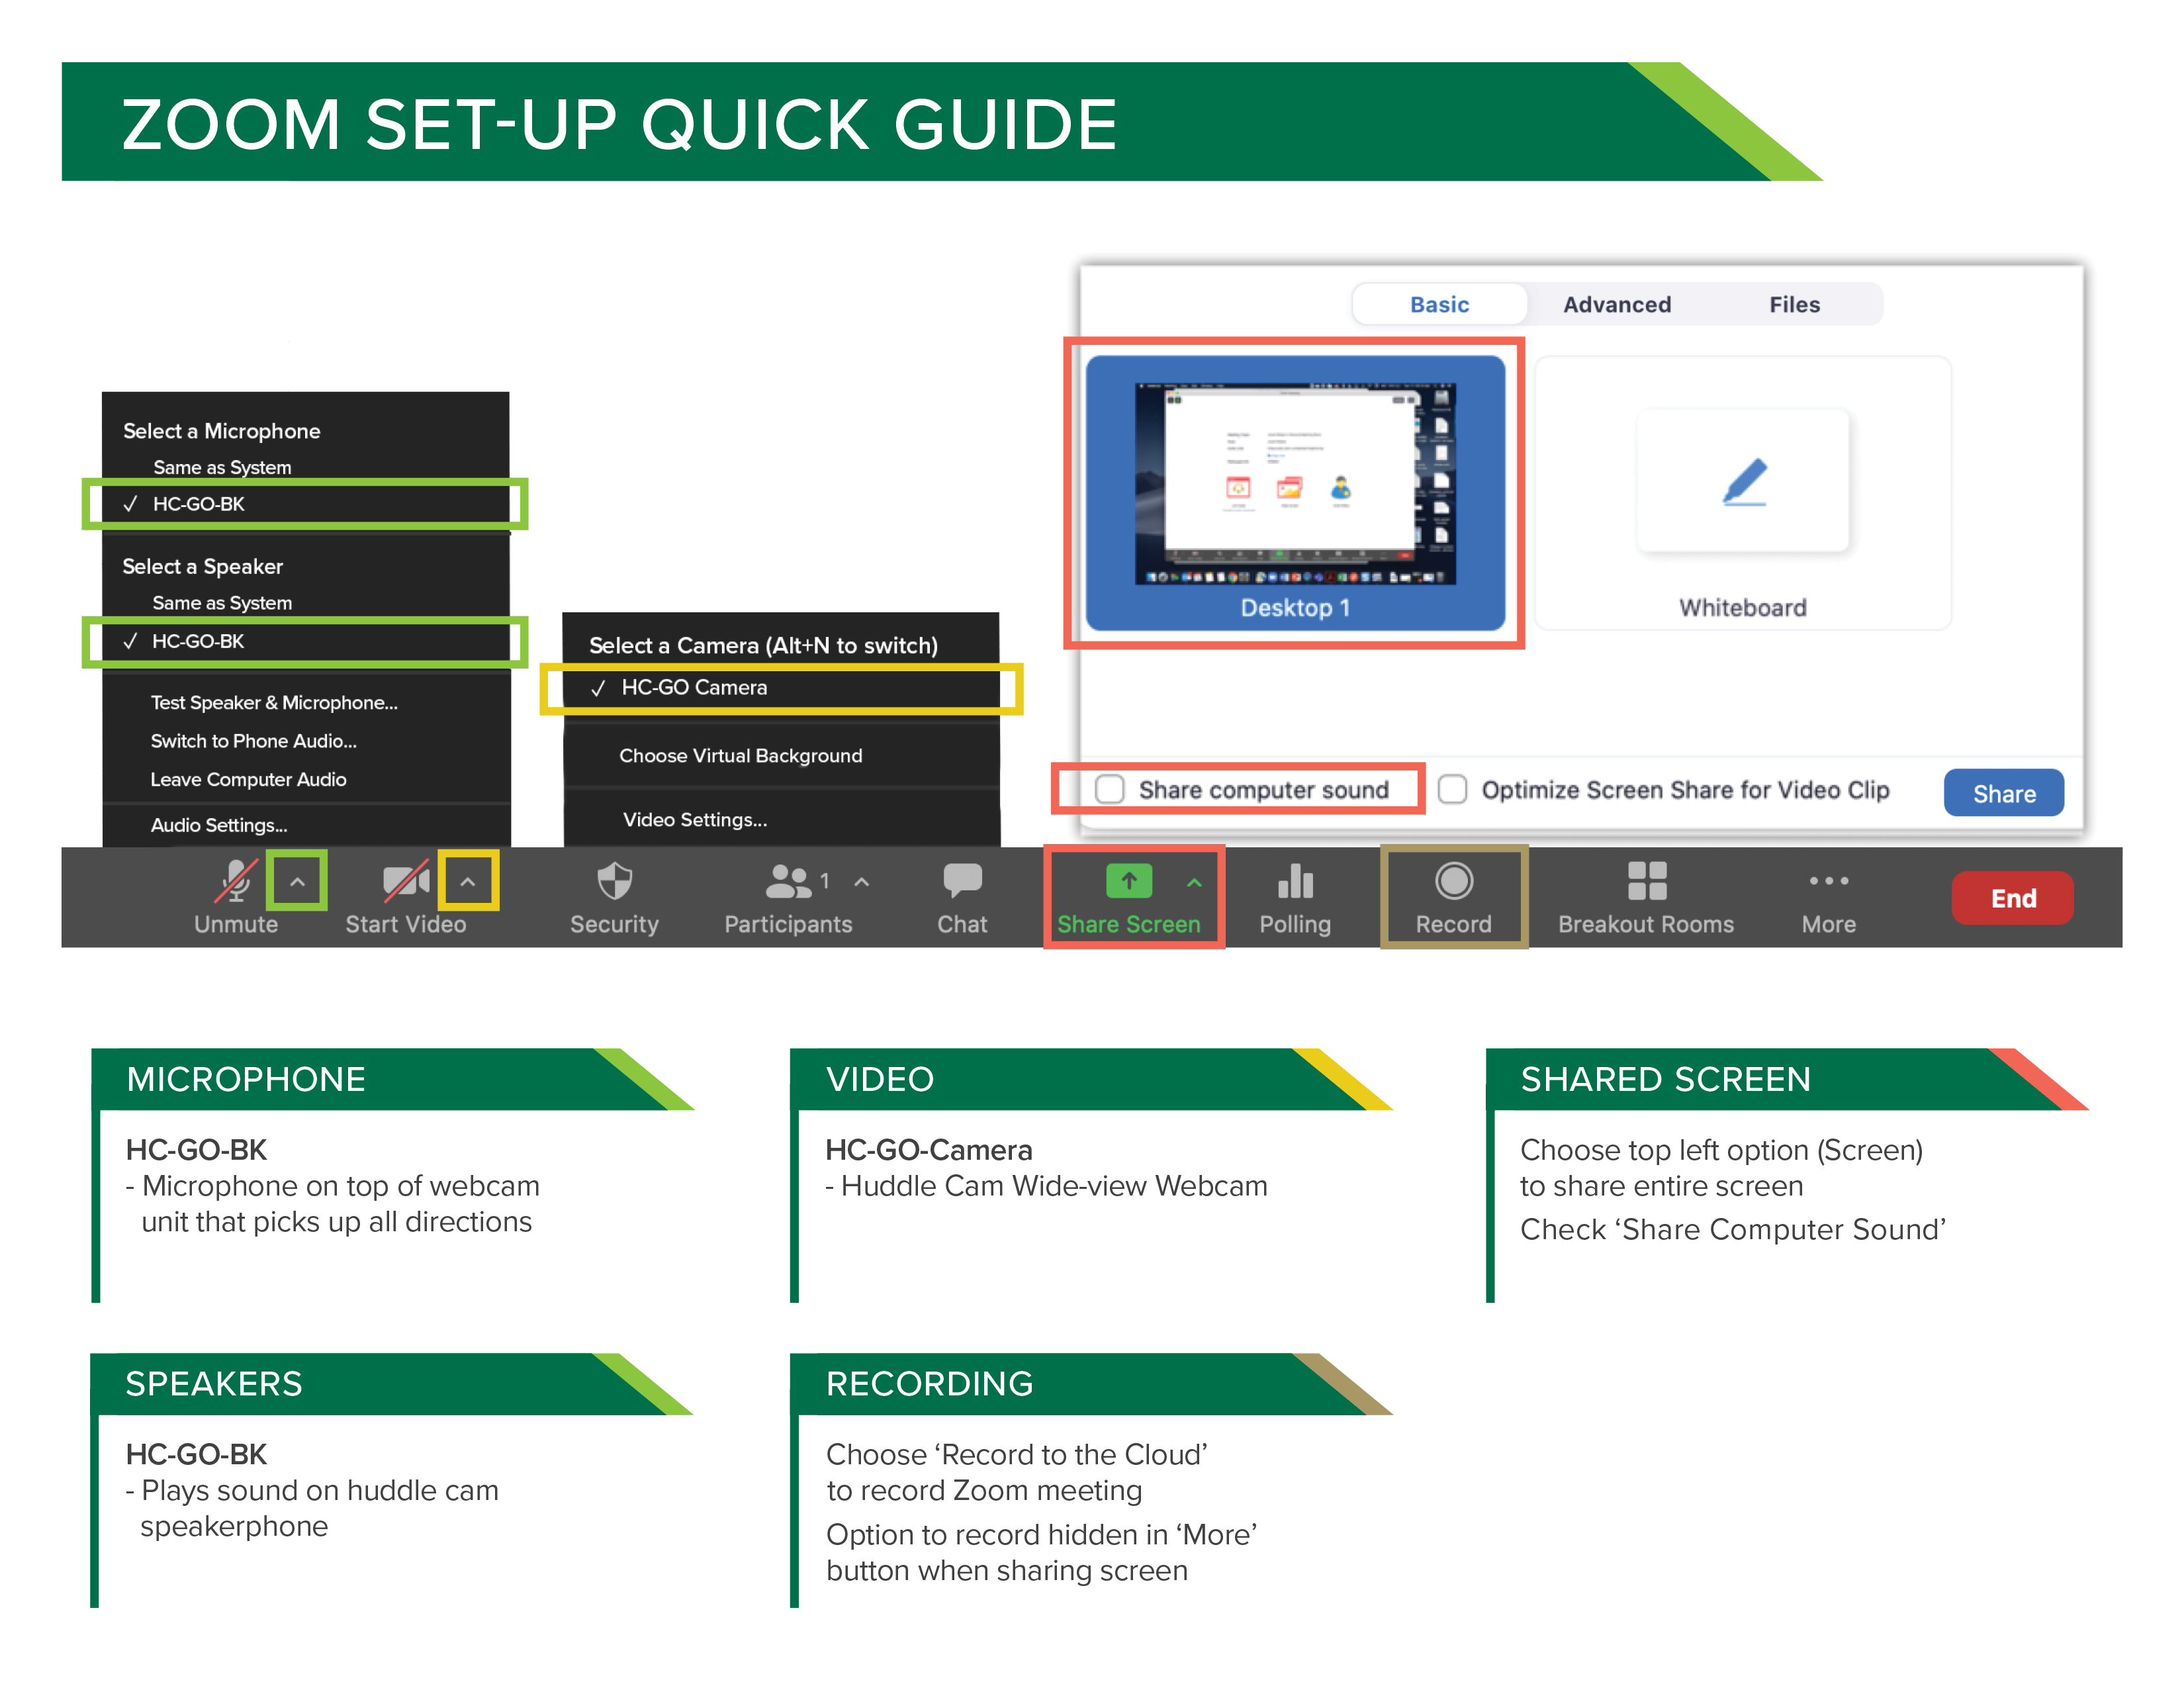
Print the above Zoom Quick Guide
-
How do students join the class remotely?
Zoom is the recommended option to allow students that are remote to see and interact with your class. Running a Zoom meeting allows students that are remote to see you and your shared content, hear you, and engage with you. See the questions below and visit the eLearning Zoom webpage for more information on using Zoom.
-
How do I schedule a Zoom meeting?
It is recommended that instructors schedule their Zoom meetings in Canvas so that students can easily access the join information needed and see the event on their Canvas calendar.
See the Zoom guide for instructors for step by step instructions on scheduling a meeting in Canvas.
-
How do I access and start a Zoom meeting in the classroom?
- Double click the Zoom (A) icon on the Lectern Computer desktop.
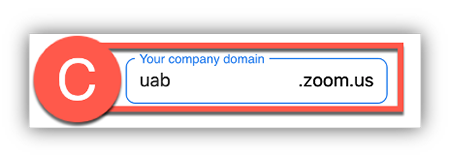
- Click Sign in with SSO (B) and type UAB (C) as the domain.

- Provide your BlazerID and Strong Password and complete the DUO requirement.
- Click Open Zoom (D) in the dialog box that appears.

- Click ‘Meetings’ to find desired scheduled meeting and click ‘Start’ or start your personal meeting room by clicking the ‘New Meeting’ icon
Note: Alternatively, instructors can start meetings by accessing the scheduled meeting in Canvas or uab.zoom.us. Click ‘Sign in’ if the “Waiting on Host to start meeting” message appears. - Double click the Zoom (A) icon on the Lectern Computer desktop.
-
How do remote students hear me?
Click Join Audio (A) on the bottom left of the Zoom toolbar and choose to Join With Computer Audio (B).
Note: Users can click the checkbox to automatically join with computer audio so that this step will not have to be repeated in future course in that particular classroom.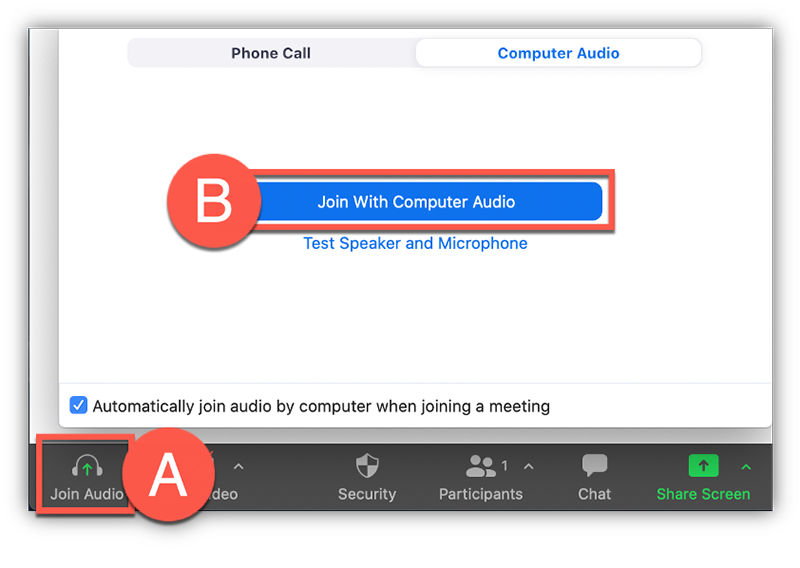
Click the Arrow (C) beside the Mute button to choose the microphone and speaker.
Microphone
Choose HC-GO-BK (D) so that participants in the Zoom meeting will hear the microphone on top of the HuddleCam.
Speaker
- Choose an HC-GO-BK (E) so that you can hear the Zoom participants across the classroom speakers.
- Click Unmute (F) when ready.
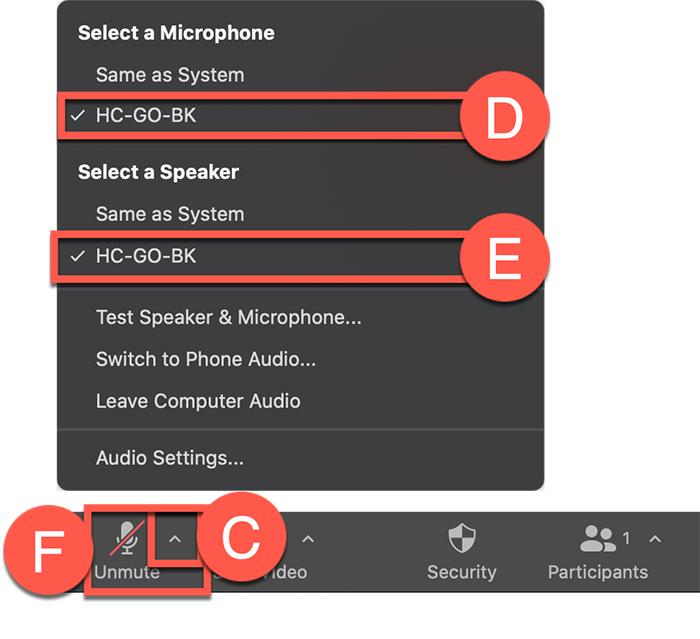 Note: We highly recommend instructors to test their microphone and speakers to make sure everything is working properly by clicking ‘Test Speakers and Microphone' option.
 -
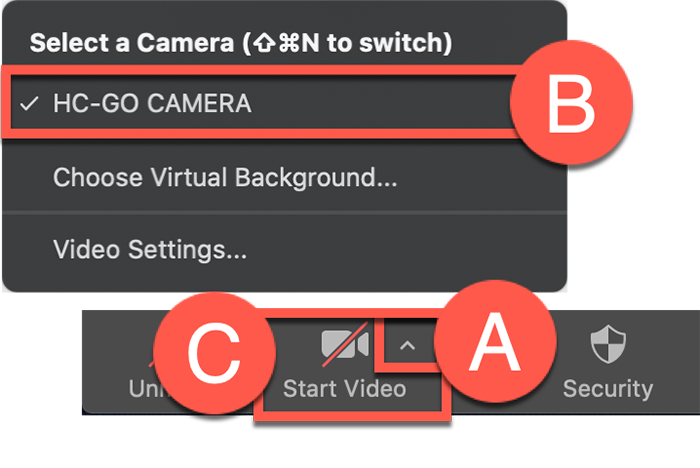
How do remote students see me?
Click the Arrow (A) beside the Start Video button to choose the camera.
Camera
- Choose HC-GO Camera (B) so that students can see you through the webcam on top of the HuddleCam webcam.
- Click Start Video (C) when ready.
-
How do I share content in Zoom meeting?
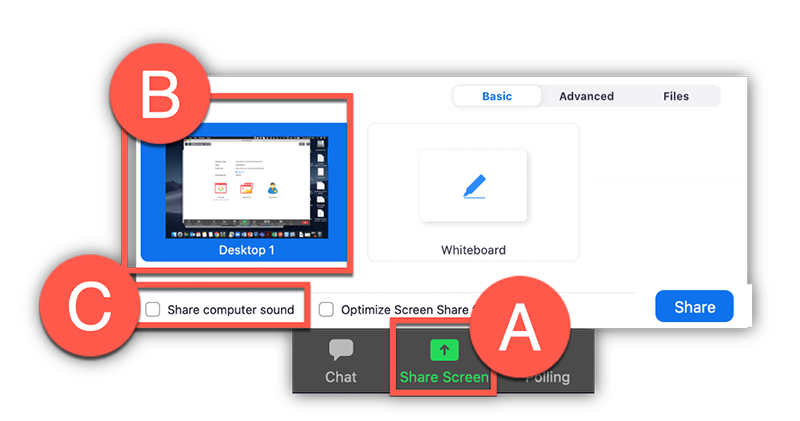
- Click the Share (A) button on the Zoom toolbar and double click Desktop/Screen 1 (B) to share the same thing you are showing on the projector in class.
- Click the Share Computer Audio (C) button if you will be playing any videos that have sound.