 UAB faculty, staff, and students have access to Microsoft Office 365 to download Office products such as Microsoft Word, Excel, and PowerPoint — and they can also use those applications in the cloud, where each user also has 1TB of storage in a OneDrive account. More information can be found on UAB’s IT Office website.
In Canvas
Canvas supports an integration with Microsoft Office 365 in Assignments, Collaborations, Modules, Course Navigation, and the Rich Content Editor. This integration allows students and instructors to use, create, share, and collaborate in real time using Office 365 files within Canvas. Users can also view their OneDrive files directly in Canvas.
Features:
- Access OneDrive files from inside Canvas course
- Assign an Office 365 (word, ppt, or excel) file as a cloud assignment
- Allow students to collaborate on documents within Canvas groups
- Students can select files from their OneDrive to submit to online assignments
- Embed OneDrive files anywhere the rich content editor is available
- Add OneDrive files to Modules that are updated automatically
- Grade Office 365 submissions via Canvas SpeedGrader
How to Access Office 365
Both faculty and students are able to access Office 365 in several places across the Canvas platform. Below are the different ways Office 365 is integrated.
Note: It is important for users to log into Office 365 with full UAB email address (@uab.edu) and not just their BlazerID.
-
User Navigation
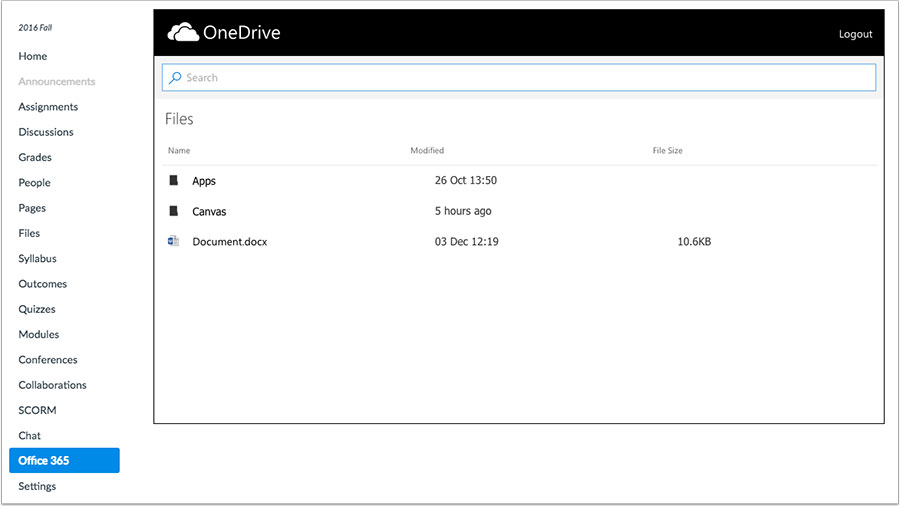
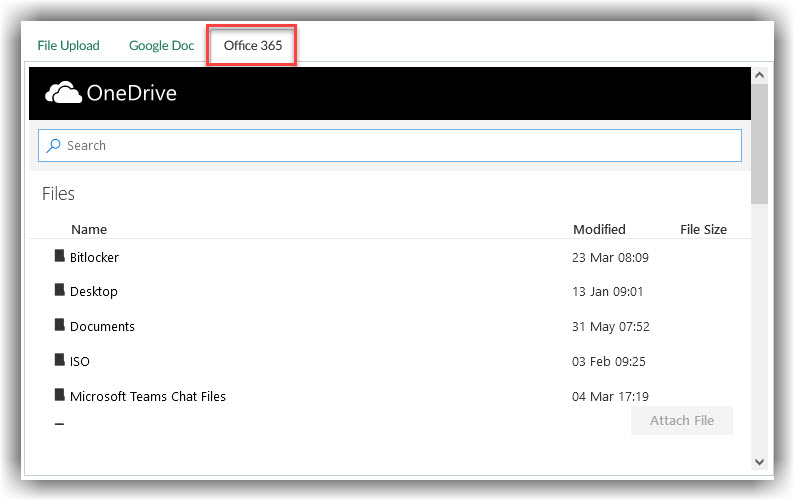
The Microsoft Office 365 LTI adds a link to a user’s OneDrive in the Course Navigation Menu. The name of the link aligns with the name added as part of the Office 365 LTI (most commonly named Office 365). After logging in to their user accounts, users can view all files in their OneDrive account.
-
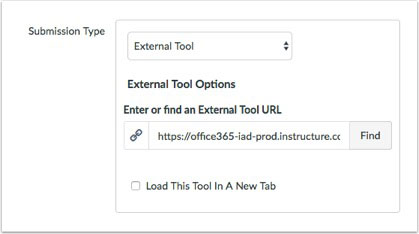
Cloud Assignments
Instructors can create an online embedded assignment through an external tool. With the Microsoft Office 365 external tool, this assignment type creates a view of the assignment file that acts as a template for a student’s assignment submission. Accepted assignment types are Word, PowerPoint, and Excel.
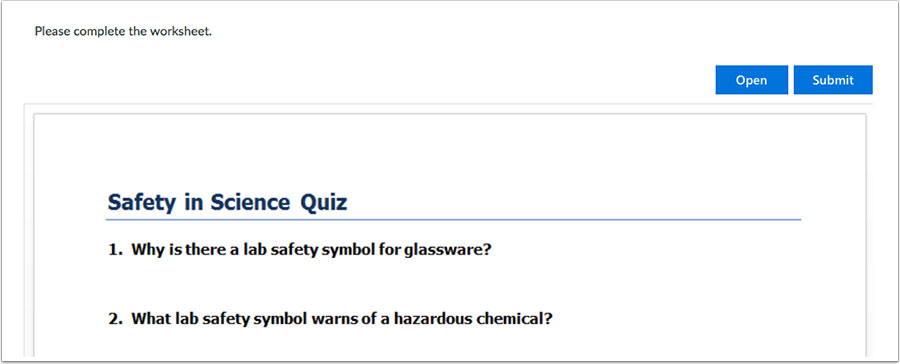
When students open the assignment, Office 365 will create a copy of the file in the student’s OneDrive folder for the course for each student’s submission. Students can open the document and make changes per the assignment instructions. When they are ready to submit the assignment, they can return to the Canvas assignment page and submit the assignment. Instructors view each student’s document copy in SpeedGrader for grading.
-
File Upload Assignments
Instructors can also continue to create regular file upload assignments. However, when an instructor allows file uploads, students can view the Office 365 tab and upload files directly from OneDrive.
-
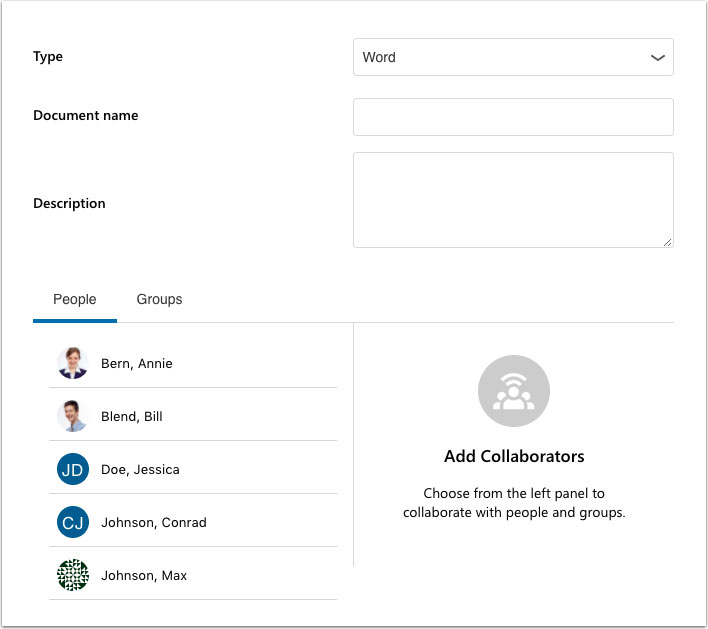
Collaborations
Users can create collaborations with Microsoft Word, PowerPoint, or Excel documents. The creator can add individual users or groups from the course to participate in the collaboration. Collaborators can be added or removed at any time, but once a user is added to the collaboration, the user always has access to the collaboration in the user’s OneDrive folder.
-
Modules
The Office 365 LTI tool displays as a Modules external tool. Instructors can add links to OneDrive documents as an external tool.
-
Rich Content Editor
The Office 365 LTI displays the OneDrive icon in the Rich Content Editor. The icon displays everything in a user’s OneDrive account and allows users to display documents as inline links. Students and instructors can view the icon anywhere they can access the Rich Content Editor, such as discussions and pages (as allowed).

Guides/Tutorials
Instructors
Guides:
- How to View Office 365 files in Canvas
- How to Create an Office 365 Collaboration
- How to Create a Cloud Assignment with Office 365 file
- How to Embed an Office 365 file with the Rich Content Editor
Tutorials:
FAQ
-
How do I allow students to submit OneDrive files to assignments?
Any assignment that allows submission via File Uploads automatically allows students to submit files from their OneDrive account.
-
How do I grade Office 365 submissions?
Office 365 files display in SpeedGrader with the Office 365 Viewer. This allows you to grade Office 365 submission in SpeedGrader.
-
Can I upload files to my OneDrive from within my Canvas course?
No, the Canvas integration with OneDrive only allows you to submit or link to the contents of your OneDrive from within your course. To upload files to your OneDrive, go to office.com and sign-in with your UAB email address (@uab.edu) and Strong Password.
-
Are there any limitations to Office 365 Cloud assignments?
Yes, some of the standard Canvas options such as group assignment, peer-review, plagiarism detection, and manual file submissions are not available when using cloud assignments.
Instructor Training
Technical Support
- Submit a Ticket
- (205) 996-5555
Privacy & Accessibility
 Kaltura is UAB's multimedia content management system. The system is integrated into Canvas, and can also be used outside of Canvas. Through Kaltura, users have access to tools such as screen recordings, editing, and automatic upload and cloud encoding of their multimedia materials for device agnostic delivery. The media can be inserted into the courses via an embed feature that is integrated into the content editor in Canvas. Kaltura is also used to manage UAB's Lecture Capture and Zoom Cloud recordings.
Features:
- Safely store/archive unlimited amount of Media
- Share media easily in or out of Canvas
- Record presentations, screencasts, or podcasts
- Engage audience with embedded questions
- Easily add captions to videos
- Make simple edits without complicated software
My Media- A portal to all your media hosted on your personal and private media space. When any individual access 'My Media', they will see their media in their account.
Media Gallery- A course specific (student facing) collection of media that you want student to acces in Canvas.
Media Space- A place to access the same media and share videos outside of Canvas.
How to Access Kaltura Media Space
Faculty, staff, and students all have access to Kaltura Media Space. The Kaltura Media Space can be accessed inside a Canvas course or outside the Canvas environment. Kaltura is known as My Media and Media Gallery inside of Canvas. It is known as Media Space outside of Canvas. Choose one of the methods below to access My Media.
Inside Canvas
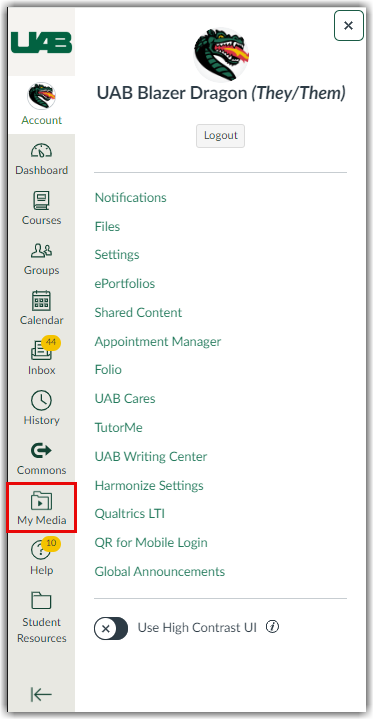
Login to Canvas, click Account, and click My Media in the user navigation.
Outside the Canvas Environment
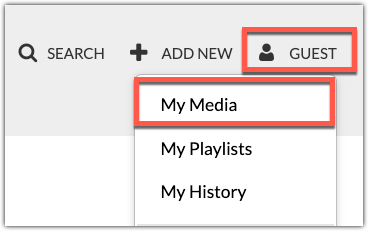
My Media can also be accessed outside the Canvas environment by navigating to mediaspace.uab.edu. Click the Account drop-down menu at the top right, select My Media. This will redirect to the “Central Authentication System” page. Type in your BlazerID and strong password and click Sign-in.
Guides/Tutorials
Instructors/Students
Creating and Uploading Media
- Add Media to My Media
- How to Download Zoom recording and Upload to Kaltura (manually)
- Kaltura Capture Guide
- UAB Lecture Capture
- Manually Record Class Using Kaltura Classroom
Searching and Editing Media
Sharing and Downloading Media
- Embed/Publish Media in Canvas
- Downloading Videos from My Media
- How to Add an Individual to View your Video
Captioning Media
- Auto-Generated Captioning Info
- How to edit captions for accuracy
- How to order captions for older content
Interactive Media
Search Kaltura Knowledge Center
Search Kaltura Learning Videos
FAQ
-
Will my media expire?
Yes, but only if it is inactive. Inactive media is depreciated in two phases.
Phase 1: Media that is not played within a period of three years is placed into storage. This does not impact access to video. If the video is accessed and played, the media is no longer deemed “inactive” and the three year period of inactivity is reset.
Phase 2: If the media remains inactive (is not played) for an additional year (four years total), the media is deleted and cannot be recovered.
To reset the period of inactivity for media, the media has to be called for playback. This means any user clicking the play button of the media and watching any length of time.
-
Is there a limit on how much media I can upload?
No, UAB has unlimited media storage with Kaltura.
-
How do I get my videos captioned?
There are two types of video captioning available through MyMedia on Canvas: Machine and Professional.
- Machine Captioning is where computer artificial intelligence is used to create captions. These captions are around 80% accurate and can be edited. This type of captioning can be requested by selecting the desired video(s) and choosing +Order Captions from the Actions dropdown menu in My Media on Canvas. See the
 Modifying Media Guide for more information on ordering and editing machine captioning. Please note machine captioning does not meet the needs of students who are approved for video captioning as a DSS accommodation.
 - Recommended option: Professional captioning is more accurate and can be requested via the UAB Disability Support Services request form. Note: Caption requests on behalf of students requiring accommodations should be done through DSS.
- Machine Captioning is where computer artificial intelligence is used to create captions. These captions are around 80% accurate and can be edited. This type of captioning can be requested by selecting the desired video(s) and choosing +Order Captions from the Actions dropdown menu in My Media on Canvas. See the
-
What if I get a third-party cookie error when trying to view media?
Third-party cookies will need to be enabled in order to view Kaltura videos inside the Canvas environment.
-
What are the system requirements to use Kaltura Capture Application?
Generally speaking, Kaltura Capture should work on most Windows or Macintosh computers, including both laptops and desktops. Please refer to the Kaltura website for more specific technical information on the minimum system requirements.
Please note that you will also need adequate bandwidth or internet speed in order to upload videos to My Media (Kaltura) in a reasonable amount of time. A cable internet connection with at least 75 Mbps download speed and 5 Mbps upload speed is recommended for the best experience. You can test your internet speed using the tool at www.speedtest.net.
If your speed is below the recommended speed, you may be able to improve it by switching from a wifi connection to a wired connection, moving your wireless device close to your wifi router, or by checking to ensure that any other internet users in your home or office and not currently using the connection for any bandwidth-intensive activities.
If you are unable to achieve the recommended speed for uploading Kaltura videos and the uploads are taking too long, you can try recording and uploading a series of shorter videos. For example, instead of recording a single 60-minute lecture video, try recording a series of four 15-minute lecture videos and uploading these videos separately.
For more information on getting started with Kaltura Capture, please refer to our Kaltura Capture article series, beginning with How to Install Kaltura Capture.
-
Kaltura Capture is failing to record, what do I do?
Try each solution below and see if it fixes the issue.
Solution 1 – Quit Kaltura Capture app:
Note that clicking the X does not fully quit the program.On a Windows computer, right-click the Kaltura capture icon, and choose Quit.

On a Mac computer, two-finger click the Kaltura capture icon, choose Quit.

Solution 2 – Restart your Computer:
Kaltura may fail to record if there are too many applications open or if there isn’t enough local memory available. Restarting your computer might help resolve this issue.Solution 3 – Delete and Re-install Kaltura Capture application:
Some issues may be a bug that has been fixed in the most recent version of the app. You can delete the application and reinstall it to see if that fixes the issue.If none of the above steps work, please fill out a ticket and an eLearning team member will contact you with next steps.
-
How do I download a video off Kaltura (My Media)
The owner of a video in Kaltura can download the video by using the following directions:
- Access My Media in Canvas or at mediaspace.uab.edu (learn how here)
- Click the Pencil icon to the right of the desired video.
- Click the download icon at the top right of the video player.


Please Note: If this video has two feeds (content and camera), only the parent feed will download (usually content).
-
How do I allow my students/viewers to download my video?
Viewers cannot download your videos by default, but you can allow them to download in one of two methods depending on how you have shared your video.
Canvas Embed:
If you are embedding your video into a Canvas page, discussion, assignment etc. you can: Choose embed options and choose the player with a download option. This allows the viewers to see a download icon at the top right of the video.
Media Gallery or Channel:
If you have published your video to a Media Gallery or Media Space Channel, follow these directions.- Locate the desired video in My Media (learn how here)
- Click the pencil edit icon at the far right of that entry.
- Click the Download tab underneath the video player.
- Check the box to Allow Downloading.
- Click Save.


This allows any viewers to see the option to download the video when viewing the video in the Course Media Gallery or Kaltura Channel.

-
How do I find Kaltura Capture recordings locally on my computer?
How do I find Kaltura Capture recordings locally on my computer?
- Open a Finder window.
- Open Finder's Go menu at the top.
- Choose Go to Folder...
- Type or copy-and-paste: ~/Library/Preferences/Kaltura/Capture/Recordings
- Click the Go button.
Opening the Capture Recordings Folder on Windows
- Open a File Explorer or Windows Explorer window.
- Into the path bar, type or copy-and-paste: %LOCALAPPDATA%\Kaltura\Capture\Recordings
- Press Enter.
Please note: If two feeds were recorded (camera and screen), they will be separate files and cannot be joined together when uploading manually.
-
What happens to Kaltura videos when my course is copied or imported into another course?
This depends on how you shared Kaltura videos in your course. See below for videos published to Media Galleries or videos that were embedded in the course.
Videos published to Media Gallery
When a course is copied or imported into another course, videos that were published to the prior course’s media gallery do NOT copy over.
Instructors can import the entire Media Gallery from one course to another by:
- Navigate to the destination Canvas course and click Media Gallery in the course navigation.
- Click the Channel Actions (A) at the top right, then click Import (B).

- Then choose the course you are importing from (C) and click Import(D).

Videos Embedded in Canvas Course
Videos that are embedded in various places across Canvas such as announcements, pages, modules, assignments, discussions, and quizzes are automatically pulled over as long as you are using the Canvas import or send tool to pull the course or specific content over.
Note: Videos do not successfully copy over if you manually copy and paste content or html code from one course to another.
Instructor Training
Archived Workshops


Kaltura Kamp
Kaltura offers a series of masterclasses on how to use video better. This isn't a "now click this button" technical training - the Kaltura Academic Media & Pedagogy series will focus on the pedagogical underpinnings of how to make videos work for students. They demonstrate how to use the Kaltura platform for these goals, but the real focus will be on how instructors can use video better to improve the student experience and increase learning outcomes.
Request Training
Group, one-on-one, or virtual sessions are available to faculty.
Technical Support
Please follow the steps below if you need technical support after reviewing the information, guides, and FAQs above.
-
Check Kaltura Status
Kaltura Status Page - Check here to see if there are any known issues before submitting a ticket.
-
Ask eLearning
Users who still need help after reviewing the information, guides, and FAQs on this page can request support from UAB eLearning using the link below.
Request Academic Technology Support
Lecture Capture Support
For Issues with LectureCapture, Classroom Technology, or UAB managed computer, please contact UAB IT.
Privacy & Accessibility
 iClicker is a classroom interactive response system that allows students to participate in polls and answer questions during class. Students can respond with a smart phone or any web-enabled device using the Student iClicker app or web browser.
See iClicker compared to Poll Everywhere and Zoom Polls here.
Features:
- Create question content locally in the applications you already use
- Gather data to gauge students' comprehension before moving on
- Poll students and display class results instantly
- Enhance large lecture class with increased student participation and interaction
- Increase students' understanding and retention of topics by keeping them engaged
- Allow anonymity on controversial questions
- Provide feedback to students on their understanding
- Check if students can apply a concept to a different context
- Transform one-way teacher lecture into teacher-student interaction
- Get a large volume of individual answers immediately
- Reduce time on administrative tasks such as grading and taking attendance
How to Access iClicker
Instructors
Download iClicker Cloud Software
Software is required to run the polls.
Download iClicker Cloud Software
Students
Download iClicker Student App
Students can download the iClicker mobile app for iPhone or Android or access via a browser on any web-enabled device.
Guides/Tutorials
Instructors
Getting Started
- How to Manage iClicker Cloud Course Settings
- How to Help Students Stay on Task with iClicker Focus - Enable iClicker Focus to help reduce distractions for mobile/laptop users.
- iClicker Cloud Polling Question Types
- How to Ask and Grade Target Questions in iClicker Cloud
- How to Share Your iClicker Cloud Course with a Co-Instructor or TA
- How to Create and Manage Assignments in iClicker Cloud
- How to Invite Students to Your iClicker Course Using Quick Join (Join with Code)
During Class
- How to Run a Polling Session in iClicker Cloud
- How to Create and Manage a Quiz Before Class in iClicker Cloud
- How to Run a Quiz Session with iClicker Cloud
- How to View Attendance with the iClicker Cloud Desktop Software
After Class
- How to Grade and View Polling Results at the iClicker Cloud Instructor Website
- How to Grade and View Quizzing Results at the iClicker Cloud Website
- How to View Exit Poll Responses
- How to Use the Gradebook on the iClicker Cloud Instructor Website
- How to View and Edit Student Scores at the iClicker Cloud Instructor Website
- How to View and Manage Attendance Data in iClicker Cloud
- How to Sync iClicker Grades with Canvas
Students
Getting Started
In Class
After Class
- How to Participate in an Exit Poll
- How to View Course History and Session Results
- How to Use Study Tools in iClicker
Additional Information
- How to Complete an Assignment in iClicker
- Student Guide: iClicker Focus
- iClicker System Requirements
- Can I change my iClicker username or delete my account?
- Troubleshooting Your iClicker Account
- Student Privacy with iClicker Cloud Attendance Geolocation - in person classes only
- iClicker Attendance Geolocation Tips - in person classes only

Technical Support
- iClicker Status Page
- Submit a Ticket
- Email Support
- (866) 209-5698
Ask eLearning
Users who still need help after reviewing the resources on this page or contacting iClicker technical support can request support from UAB eLearning using the link below.
Privacy & Accessibility
 GoReact is a tool for teaching performance-based skills online. It is a cloud-based video tool that integrates a variety of feedback options and grading of student video assignments. This tool lends itself to communication and public speaking, interpretation, clinical training, evaluations, performance arts, etc.
Features:
- Record directly to the assignment, no file upload necessary
- Synchronize presentation slides with webcam video
- Comments are time coded and editable
- Self, peer, and instructor critique
- View stimulus, recording and feedback in a single screen
- Grade is passed back into Canvas gradebook
- Create, store, and share rubrics and marker set
- Track skills, standards, and more with timestamped markers
- Allows multiple cameras for online group video projects
- Activities can be timed and limited to amounts of attempts
How to Access GoReact
Instructors
All instructors have access to use GoReact inside of the Canvas Learning Management System (LMS). Instructors will create a GoReact assignment by choosing GoReact as the external tool with a Canvas assignment. See how Instructors can set up a GoReact assignment.
Students
Students have access to GoReact when an instructor chooses to use it through a Canvas assignment. See the guides below.
Guides/Tutorials
Instructors
- What Activity Type should I Choose?
- Creating a GoReact Assignment in Canvas
- GoReact Activity Settings
- Critiquing Videos
- Turn a GoReact Activity into a Test
- Course Reports to See Student Activity
Students
- 101 Student Video
- Posting to a Self-Submit Activity
- Posting to a Stimulus Activity
- Posting to a Live Event Activity
- Posting to a Comment Only Activity
- GoReact Activity Settings Explained
- Critiquing Videos in GoReact
- Completing a Student Rubric
- How to Review Video Feedback
- Video Recording Checklist
Instructor Training
Archived Workshops
Request Training
Group, one-on-one, or virtual sessions are available to faculty.
Technical Support
Instructors
- Submit a ticket
- (801) 717-3499, Option 2
Students
Ask eLearning
Users who still need help after reviewing the resources on this page or contacting GoReact technical support can request support from UAB eLearning using the link below.
Privacy & Accessibility
 Cengage is a platform that offers textbooks, eBooks, eChapters, digital solutions, online homework, study tools, textbook rentals and more that can be linked inside of Canvas.
Instructors
Faculty can integrate assignments and Cengage materials into Canvas by first adding the Cengage course navigation link to their Canvas course. Once added, click the link and follow the on-screen directions.
Students
If an instructor is using Cengage resources in a course, they can access Cengage by clicking any Cengage activities in the course.
Download Cengage Mobile
Instructors
Guides:
- Faculty Quick Start Guide
- Cengage in Canvas Guide
- Course and Section Management
- Training Assignments Guide
- Copy a Canvas Integrated Course Guide
Tutorials:
-
How do I create or link a Cengage MindTap course in Canvas?
From Canvas, you can either create a new linked MindTap course or link to an existing MindTap course.
You have some flexibility when you link your Canvas and MindTap courses. Some typical workflows are described here.
- Create/access your course in Canvas.
- Click the Cengage link in the course navigation.
- Choose one of the following:
- Configure the learning path in your MindTap course with the activities you want to use.
-
How do I access my digital product purchased from Cengage?
- After you purchase your product, you will automatically land on your dashboard (you can also access your dashboard anytime by logging into Cengage).
- Click on your product under “My Products."
- Some products require an additional step to complete registration:
- If you have a course key, you will be prompted to enter it.
- If you are using a third-party product (such as WebAssign or iLrn) a new tab will open with instructions to complete registration.
- If you are using an LMS, such as Blackboard or Canvas, you can copy the access code from your dashboard and paste it in your LMS, then follow the prompts to complete registration.
Note: During heavy volume periods, it can take several minutes for purchased items to populate. If you don't see your content, try refreshing the page. If your content doesn't show up within the hour, contact Customer Service.
-
Why are the total points possible not the same for every student?
Activities without due dates are not included in the points possible until they are completed. For this reason, the total points possible for each student depends on the activities completed by that student.
-
Where can I get more information?
Visit the Cengage help page for more information.
Cengage has a library of recorded Webinars available to faculty.
- Submit a Ticket
- (800) 354-9706