Kaltura Capture is a desktop recording software that has a simple user interface, requiring only one click to record, without complex setup or a lengthy learning curve. It can record your webcam, screen, microphone, or a combination of those options. Kaltura capture is supported both on Windows and Mac. Click the buttons below to navigate this guide.
Note for users of screen readers: letters in parentheses in the instructions below refer to corresponding areas on example images. If you have any questions about these instructions, contact Learning Technologies support for assistance.
Launching Kaltura Capture
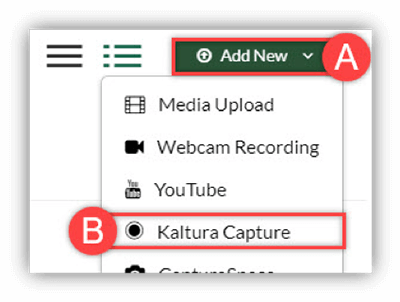
- To record a presentation using Kaltura Capture, access My Media, click Add New (A) and then Kaltura Capture (B).
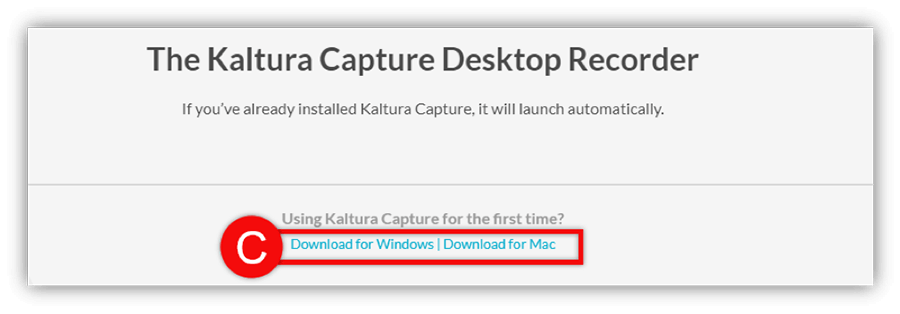
- If you are using Kaltura Capture for the first time, click the appropriate Download link (C) for your computer operating system. If you have already downloaded Kaltura Capture, skip to the next step (3).
- The Kaltura Capture application should automatically launch on your computer.
Setting up the Recording
Webcam Options
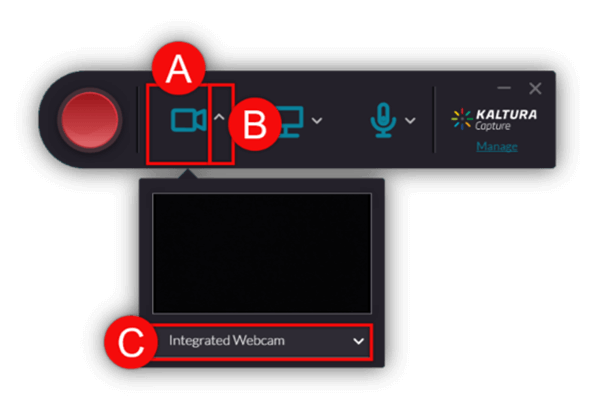
- To turn the webcam ON/OFF for the recording, click the Video Camera (A) icon.
- To choose which camera/webcam to record, click the arrow (B) beside the video camera icon, click the drop down menu (C) and make the desired selection.
Computer Screen Options
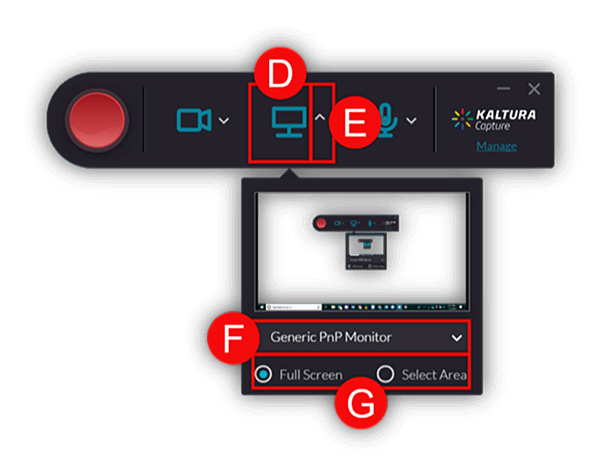
- To turn the recording a computer screen ON/OFF for the recording, click the Computer Screen (D) icon.
- To choose which screen to record, click the arrow (E) beside the computer screen icon, click the drop down menu (F) and make the desired selection. Choose to record the Full Screen or a Selected Area (G).
Audio (Microphone) Options
- To turn the audio ON/OFF for the recording, click the Microphone (H) icon.
- To choose which microphone to use for the recording, click the arrow (I) beside the microphone icon, click the drop down menu (J) and make the desired selection. Learn how to make system audio record.
Recording Media with Kaltura Capture
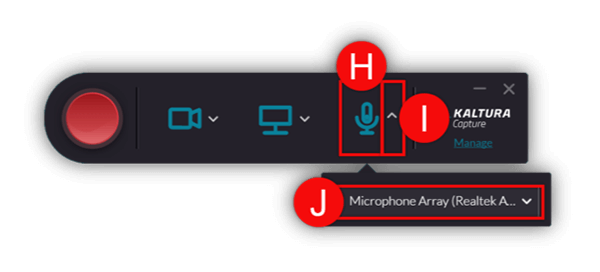
- Click the red Record (A) icon when all settings are as desired and you are ready to record. A five second count-down will appear and count down the start of the recording.

- Click the Stop (B) icon to stop the recording. A follow up menu will display to confirm this decision.
- Click the Pause/Record (C) icon to pause and resume the recording.
- Click the Cancel (D) icon to stop and discard the current recording.
- The recording menu displays the current Elapsed Time (E) of the recording.
- The Microphone (F) icon will be colored blue to signify microphone audio has been enabled for this recording. If the microphone icon is grey with a strike through it, this signifies microphone audio has been disabled for the current recording.
- Click the Minimize (G) icon to minimize the recorder into the taskbar/dock.
 Note: If the recording menu is not minimized, it will be visible in the recording video.
 - Click the Pencil (H) icon to annotate on the screen being recorded.
- You can choose between the following Tools (I) when annotating: pencil, arrow stamp, text creator, object selector, and a cursor.
- You can choose which Color and Size (J) when using the annotation tools.
- Click the Trash (K) icon to erase all annotations.
Saving and Uploading a Recording
Media recorded with Kaltura Capture needs to be uploaded when there is an internet connection. The uploaded media can be found in My Media either in Canvas or at mediaspace.uab.edu.
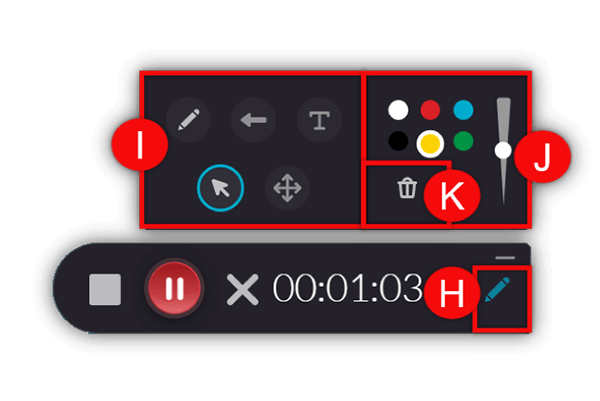
- Once you stop a recording, you will be directed to the Entry page (A).
- Click the Play (B) icon to preview the recording.
Note: Two screens will display vertical if you chose to record two video feeds (ex. Screen & Webcam). This view is just for previewing each feed separately. It will combine the two feeds in the Kaltura Interactive player once you upload the video. - Click the Sound (C) icon to Mute/Unmute the audio on the playback of the recording.
- Enter the desired Title, Description, and Tags (D) for the recording.
- Click Delete (E) to discard and delete the recording.
- Click Save and Upload (F) to save the information and upload the recording to your My Media.
- Click Save (G) to save the recording and information and upload at another time (for offline use). For more information and details, see the full Kaltura Capture Guide here.
Managing Kaltura Capture Recordings
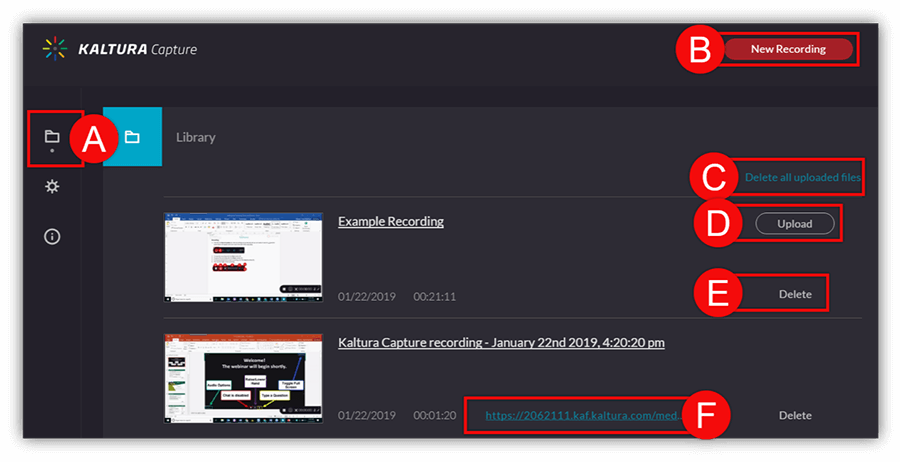
- Once a video is saved, you are brought to the Kaltura Capture Library. You can access this library by clicking the Folder (A) icon at the top left.
- Click New Recording (B) to start another recording.
- Click Delete all uploaded files (C) to delete all media in your local library that have been uploaded to My Media. This will clear space on your local computer.
- Click Upload (D) to upload a video to My Media. This will require an internet connection. A progress bar will appear and a message will appear when the video is successfully loaded.
- Click Delete (E) to individually delete videos from your local library.
Note: If you delete a video that has not been uploaded it cannot be undone. - A direct link to the uploaded video in My Media is provided for video that have been uploaded.
Note: This link is only for you and cannot be shared.
Changing Kaltura Capture Settings
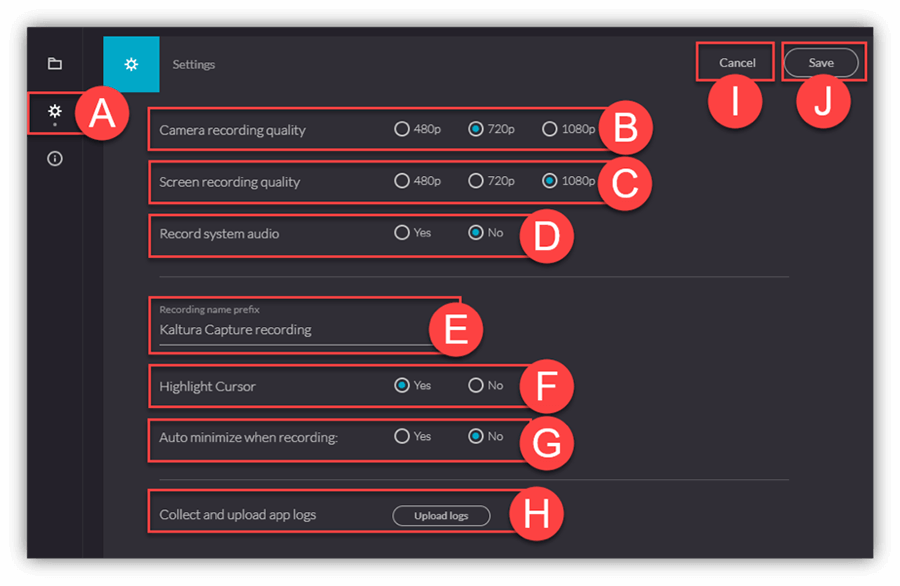
- Click the Setting Gear (A) icon on the left to access the settings page of Kaltura Capture.
- Choose the desired quality of Camera Recordings (B).
- Choose the desired quality of Screen Recordings (C).
- Choose if you want System Audio (D) to be recorded.
Note: Choose YES if you want to record a video on your screen or play a song. - Choose the desired Recording Name Prefix (E) for default names.
- Choose if you want the Cursor Highlighted (F) when you click an item while recording.
- Choose if you want the Recording Controls to be Auto Minimize (G) when the recording starts.
- Click Upload logs (H) to upload a log of all collection and upload processes to Kaltura. These could be used by technical support if you experience issues. A token is provided to be sent to admins for support.
- Click Cancel (I) to exit the settings page and discard all changes.
- Click Save (J) to save and apply all settings to future recordings.
